
DIY Christmas baubles doesn't necessarily mean spending hours in your very own Santa's workshop, handcrafting every single one... unless you want to. With a little festive inspiration, you can add a personal touch to ornaments and decorations by using blank baubles. What's more, by taking a custom approach to your Christmas baubles, they can be half the price of traditional Christmas decorations.
Not only will these crafty ideas help save a penny or two, but it’s festive fun for the whole family. Get the kids involved with playful projects, such as painting candy cane stripes or making peppermint garlands. Homemade ornaments are also a great gifting idea for personalised Christmas decorations that your loved ones can treasure as a keepsake.
Best materials to make DIY Christmas baubles at a glance:
• Best clear baubles for filling: Himaly Clear Baubles – Buy now on Amazon UK
• Best blank baubles for decorating: DRERIO Round Wooden Baubles – Buy now on Amazon UK
• Best blank star ornaments: DLUSZERT Christmas Wooden Star Ornaments – Buy now on Amazon UK
If you're into crafting and own a digital craft machine, such as the Cricut Explore 3, you can create an incredible array of DIY Christmas decorations. There are even bauble templates on Etsy available as digital downloads.
But, it's the time of year when there's something nostalgic about taking a traditional approach to making. From painted wooden baubles, crocheted snowflakes, or even making an miniature scene inside a glass globe – these are just a few whimsical ideas to create charming and heartfelt decorations. Scroll to the ideas section below for lots of DIY Christmas bauble and ornament inspiration – mix and match ideas to create you own collection🎄.
Best DIY Christmas bauble materials
Best clear baubles for filling
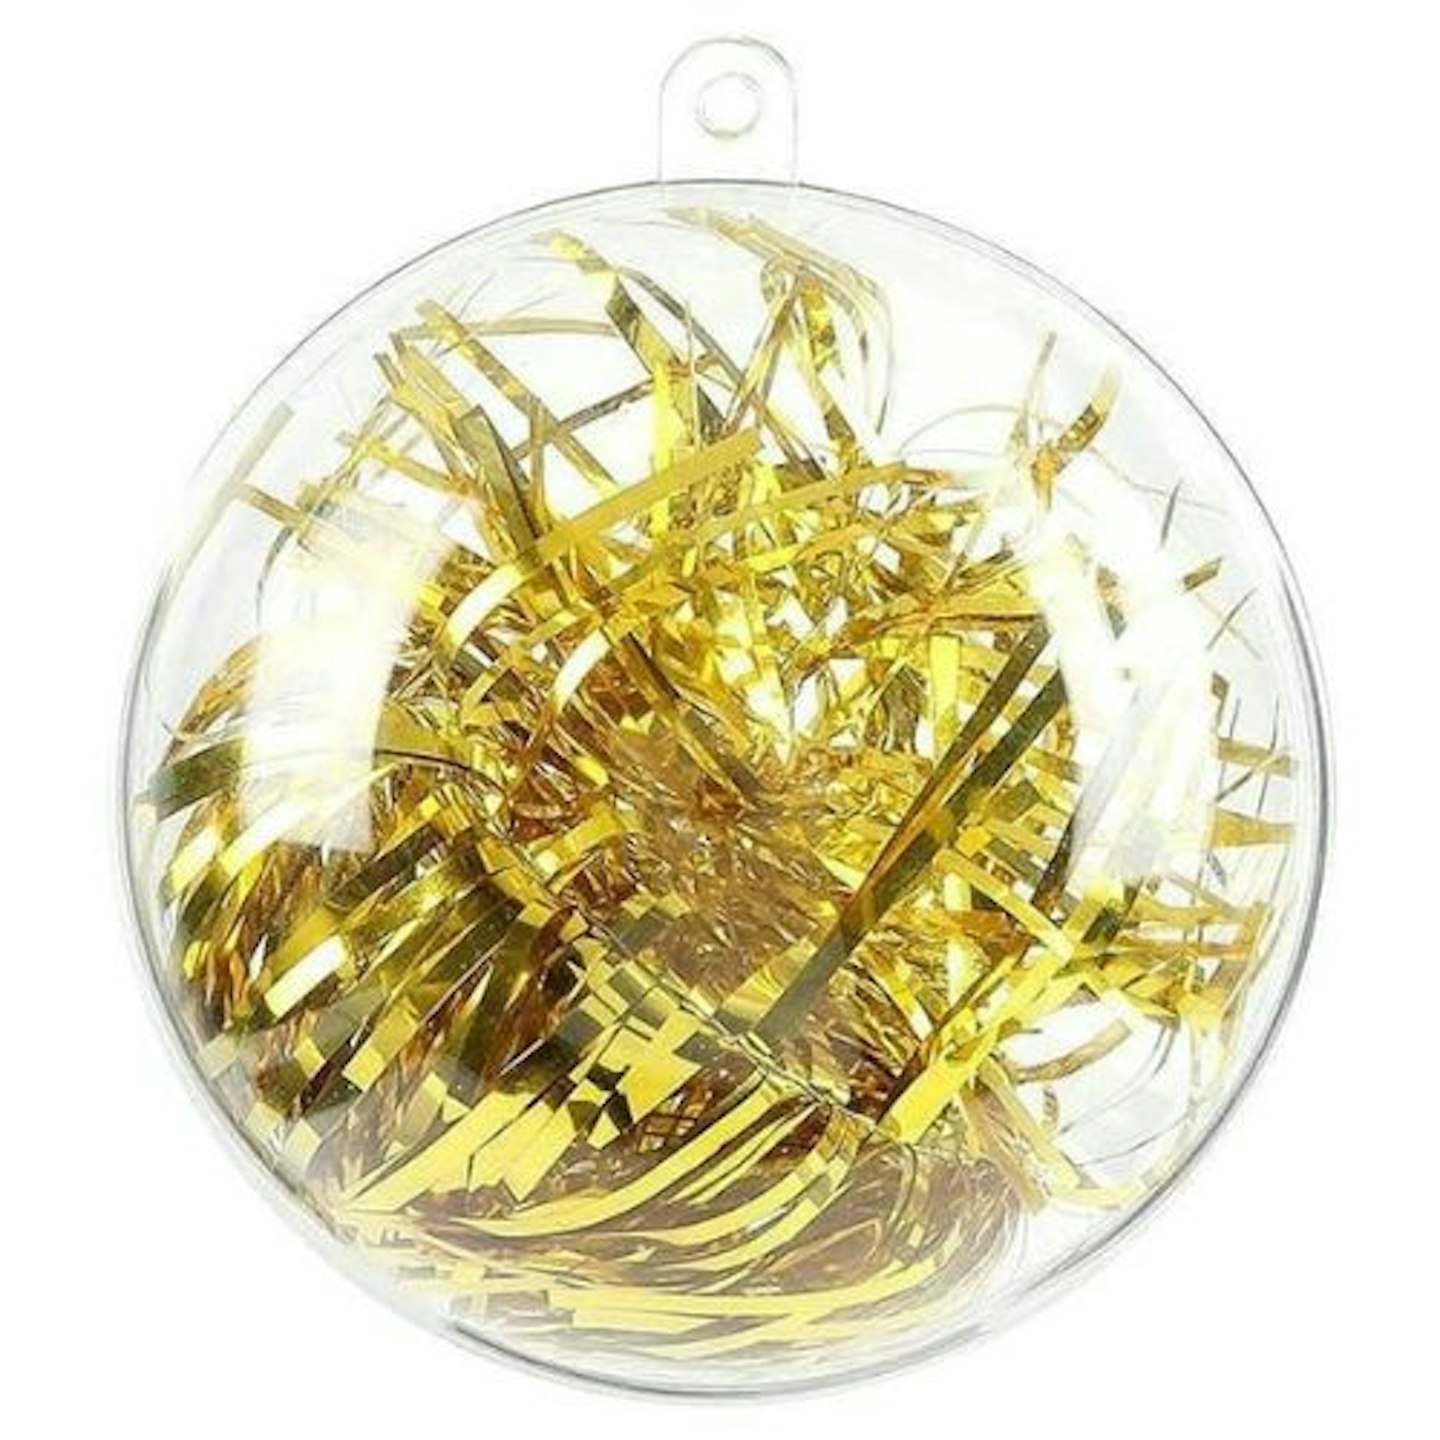 Himaly
Whether your theme is a whimsical lollypop land or a nature-inspired Christmas, these 20 eco-friendly plastic baubles come in two halves to be filled with sweets or decorations. They have a pre-made hole, so they are easy to hang. You can choose from 5cm, 8cm, or 10cm diameter baubles—we've linked to the 8cm. You could make glitter confetti baubles by decorating the outside with glittery pens. Alternatively, if you don’t trust your art skills, why not fill them with glitter or confetti? The possibilities with these clear baubles are simply endless.
This Amazon's Choice recommended product is praised in reviews for being made of strong, sturdy plastic. Some reviews comment that they had some baubles that wouldn't click together when they purchased in bulk.
Pros
- Great value for money
- Sturdy plastic that's drop-resistant
- Range of sizes available
Cons
- When purchased in bulk, some customers had a few baubles left over that wouldn't click together
Best blank baubles for decorating
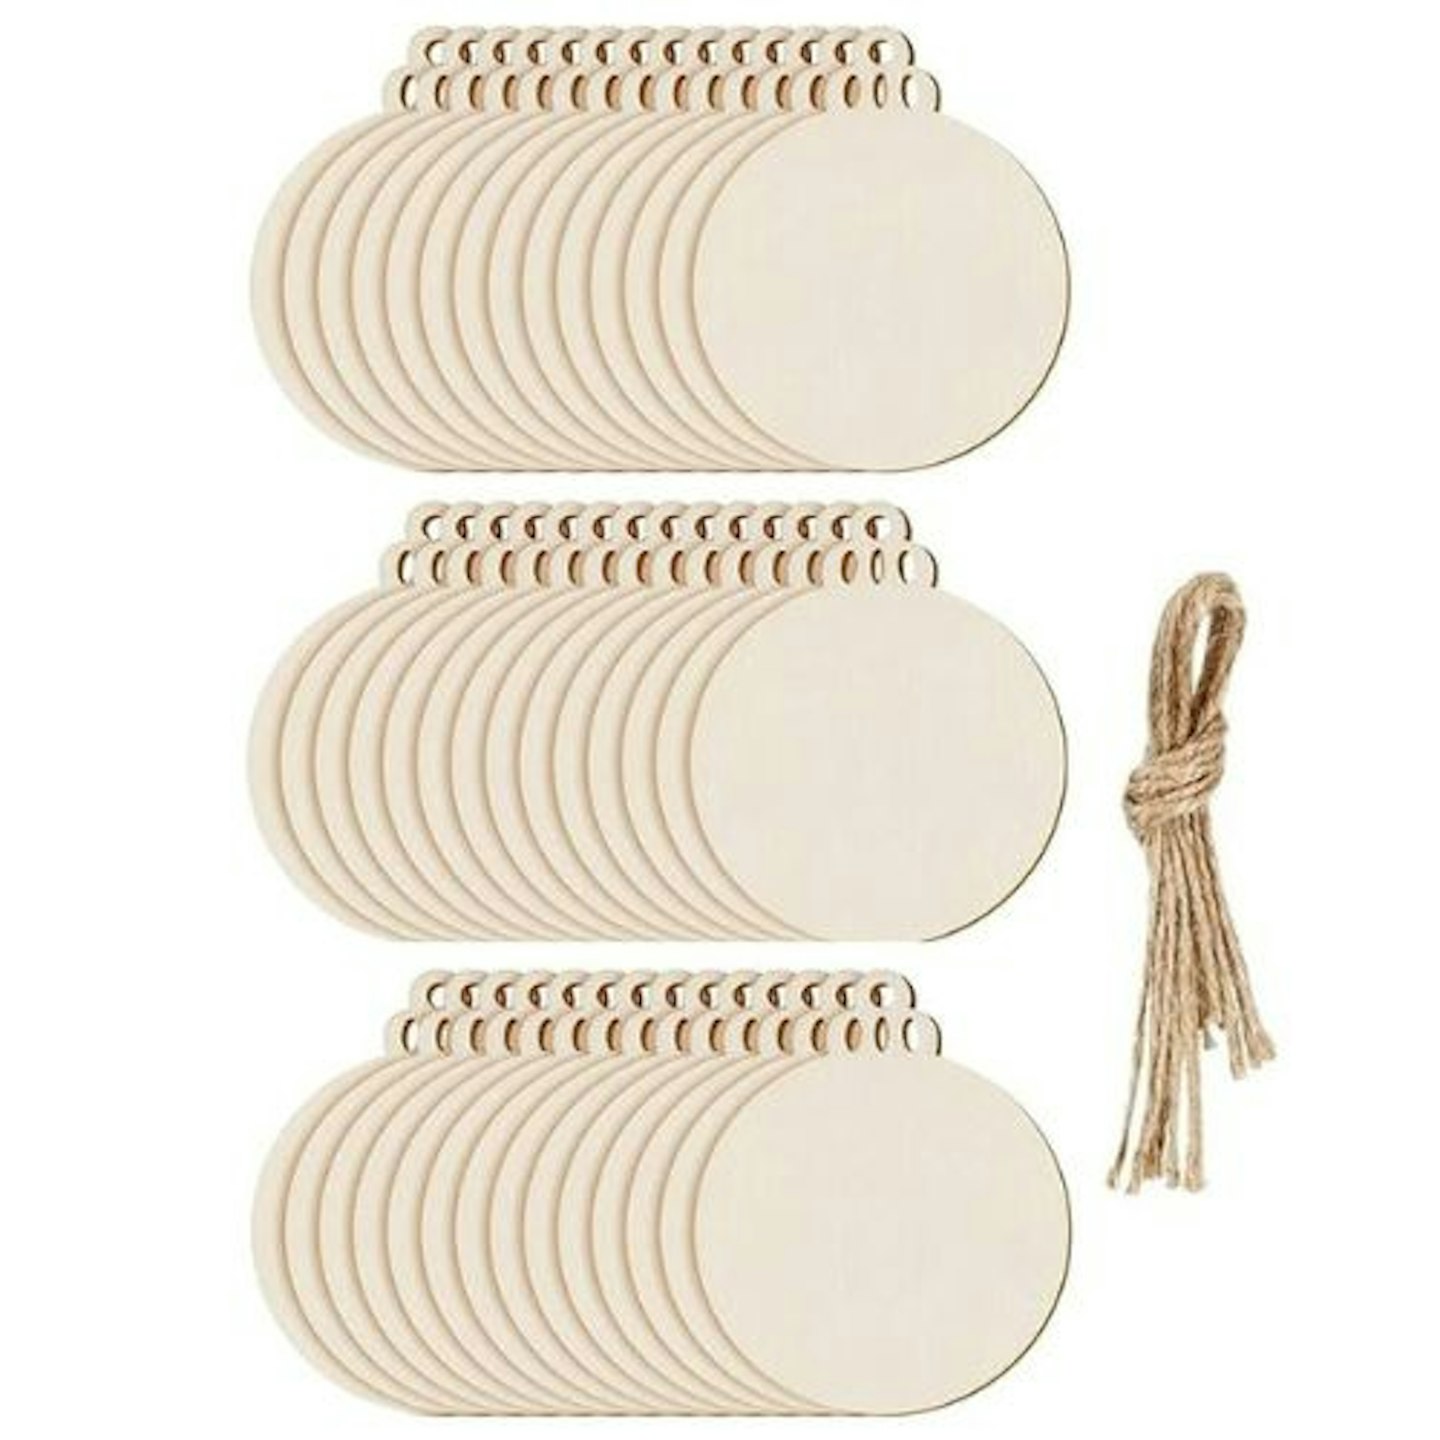 DRERIO
This set of 100 round wooden baubles offers endless possibilities for personalisation. They are a wonderful choice for adding messages or names, whether for a charity Christmas tree festival or as a touching memorial for loved ones during the festive season. Alternatively, the blank surface could be decorated with vinyl designs, cut with a Cricut machine. Use paint, pens, ink, glitter, or collage to create one-of-a-kind baubles that reflect your style.
The DRERIO Round Wooden Baubles are an Amazon's Choice recommended product and are available in packs of 30, 50 and 100. Each wood disc has a pre-cut hole for hanging and twine is supplied. Clear acrylic baubles are also available.
Customers praise the quality of these DIY baubles and say the smooth surface is perfect for decorating.
Pros
- Great value for money bulk buy blank baubles for decorating
- Smooth and flat surface is suitable for a range of craft materials
Cons
- Bear in mind they are a flat surface, not spherical
Best blank star ornaments
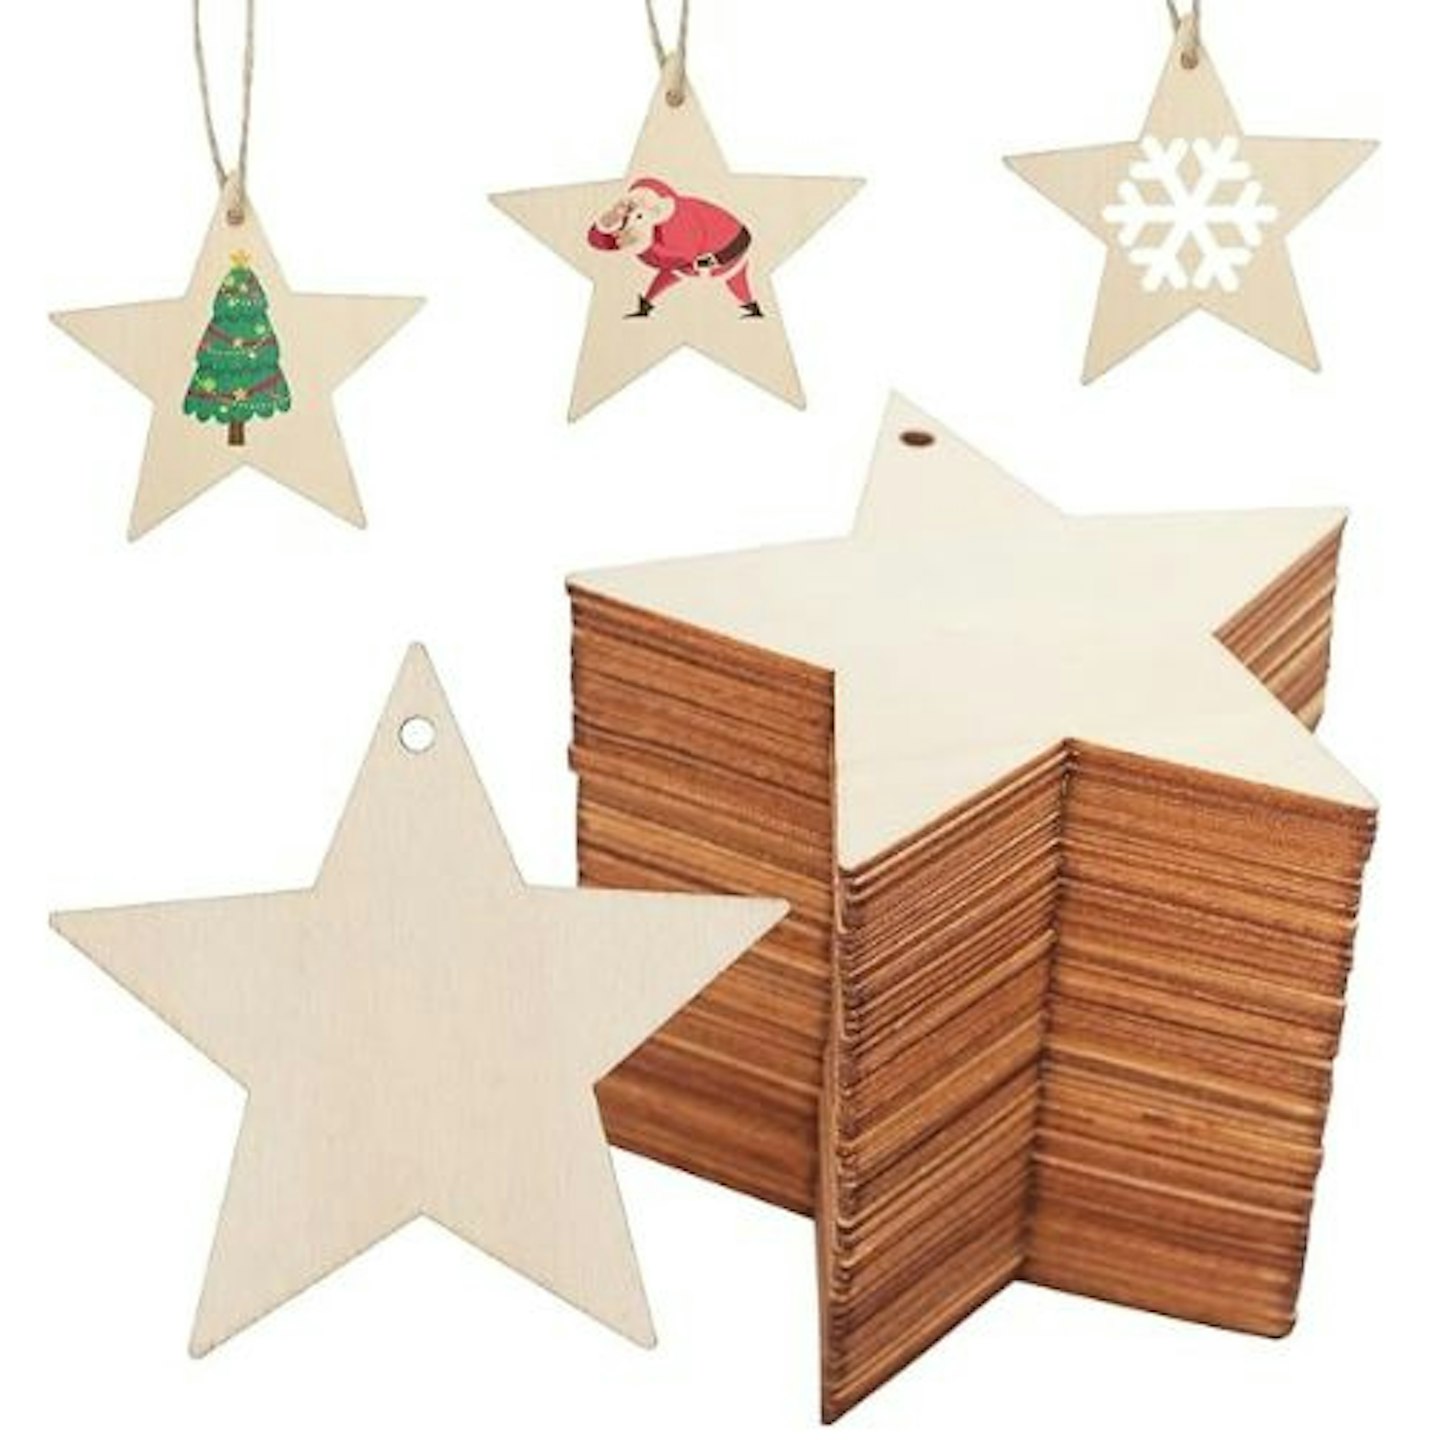 DLUSZERT
Perhaps you're having a boho Christmas this year? The star shape and firm wood make these blank shapes perfect for having a go at yarn-wrapped baubles. There's 75 stars in a pack and each star is 7cm. Plus, the pack comes with a 10m string. The wood surface is unfinished, so a wide range of craft materials will adhere to it.
Whilst there are no customer reviews for this product, Dluszert has a wide range of craft products available to buy on Amazon, with favourable reviews.
Pros
- Ideal for custom decorations at an event, such as a Christmas tree festival
- Use the stars as gift tags too
- A wide range of craft materials will adhere to the unfinished wood surface
Cons
- Only one pack size available
Best glitter pens for decorating
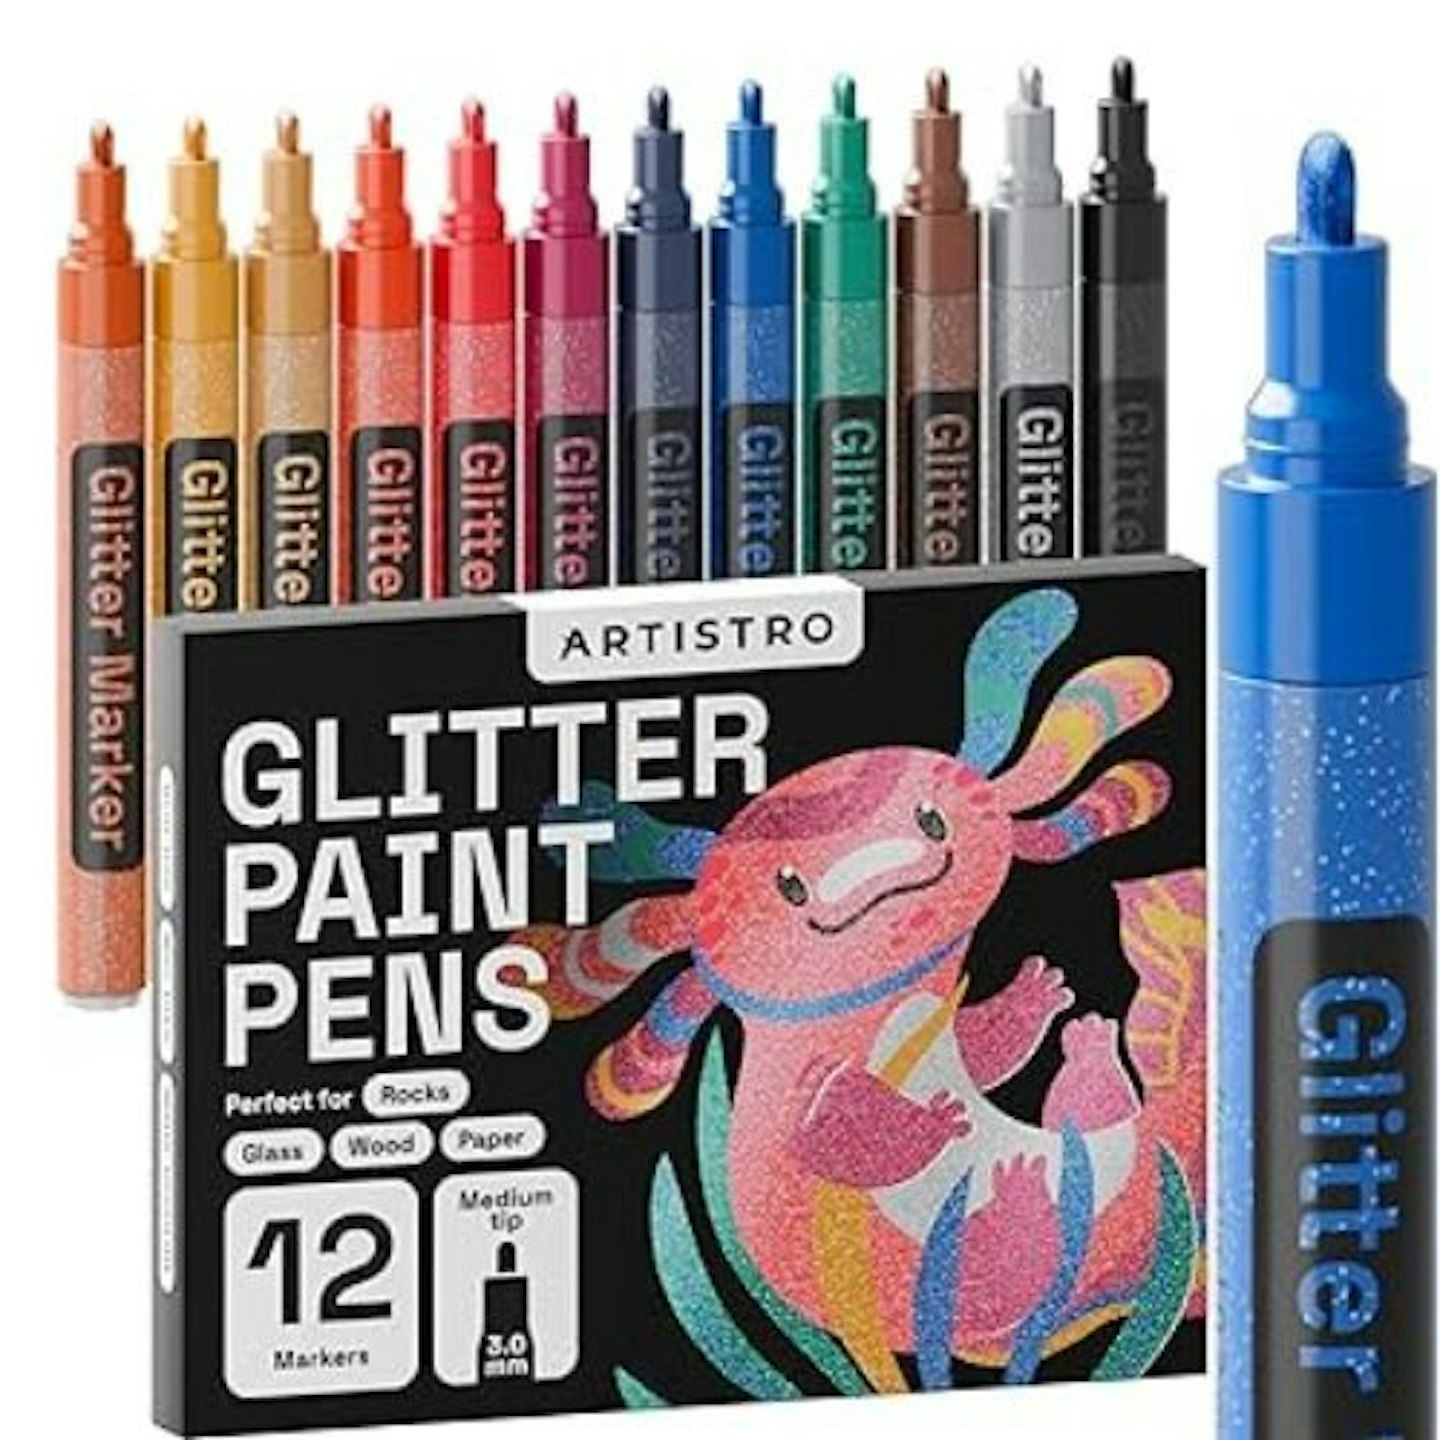 ARTISTRO
Looking for some glitter pens to decorate your baubles? Whether you want to achieve a frosted effect or sumptuous metallic stars, these ARTISTRO Glitter Paint Pens work on various surfaces and can colour in or draw fine details. The ink is water-resistant and flows without spurts or clogging, which can be an issue with some glitter pens.
The exciting set of colours includes a Sugar Plum Fairy purple, Gold Tinsel, and Mermaid Tail green—the names are enough to get the imagination working! We've linked to the medium-tip pen set, but an extra-fine tip is also available. The pens can even write on black surfaces.
Customer reviews highly praise these glitter pens for being able to achieve fine details in vivid metallic ink. However, they are a bit like paint and need time to dry, so they may not be the best pen set for small children.
Pros
- Suitable for creatives of all abilities and children
- Versatile and covers a range of surfaces, including glass, rocks, wood, metal, and more
Cons
- The ink needs time to dry, so are not be ideal for small children
Best chunky glitter
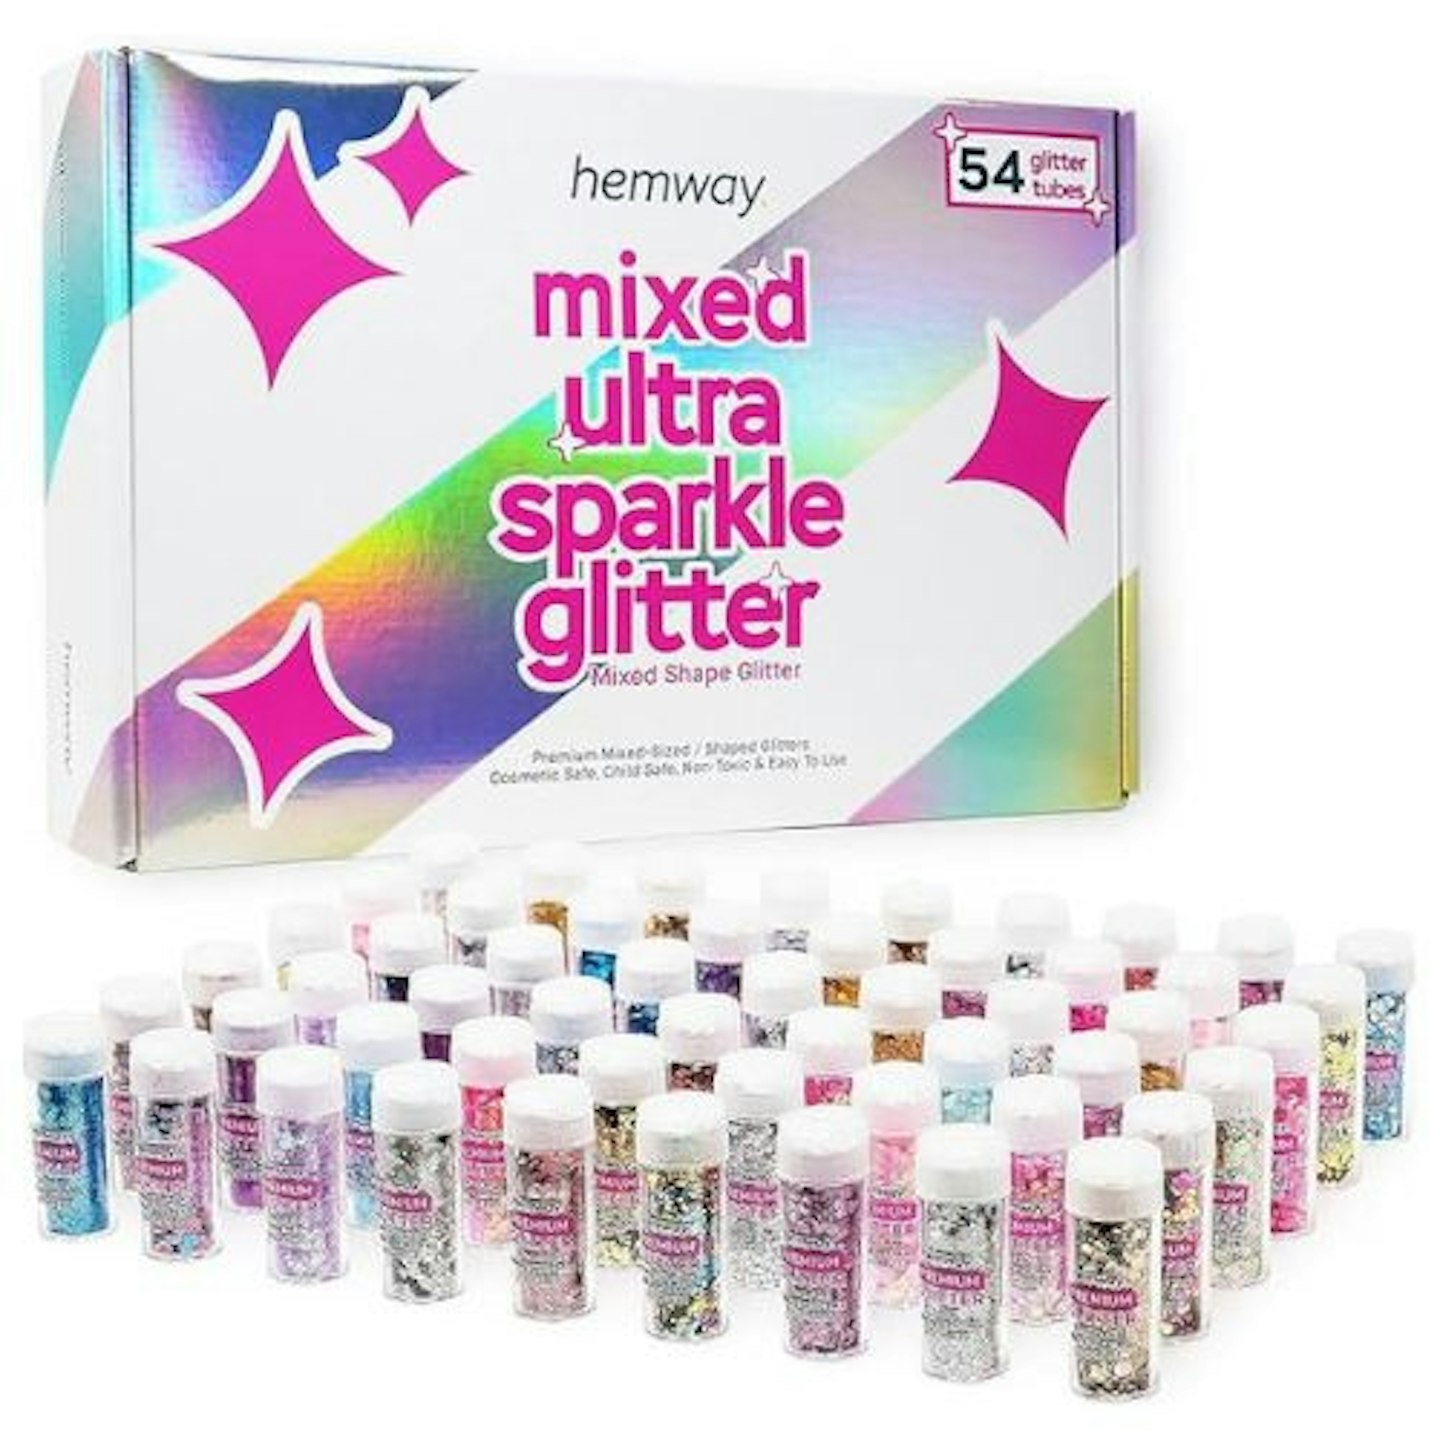 Hemway
Any creative individual would feel like a kid in a sweet shop with this array of 54 sparkly glitter mixes to make decorations with. There are unique glitter mixes, including Silver Holographic Stars & Moons, Peach Pink Iridescent and Bright Gold Black Tiger. The chunky glitter flakes can be scattered onto a surface, glued in place or used to fill vessels – such as fillable baubles.
Each glitter mix comes in its own resealable shaker, making it a great gift for Christmas and beyond. Whether you're making cards, nail art, or resin objects, this Hemway Mixed Chunky Glitter has your DIY craft project covered.
Customers highly praise the sparkle and versatility of this glitter set. It's good quality, has a fantastic range of colours and is good value for money.
Pros
- Excellent value for money
- Good quality glitter and a range of colour mixes
- Versatile – can be used for craft, nail art and body adornment
Cons
- Not suitable for small children
Best personalised photo baubles
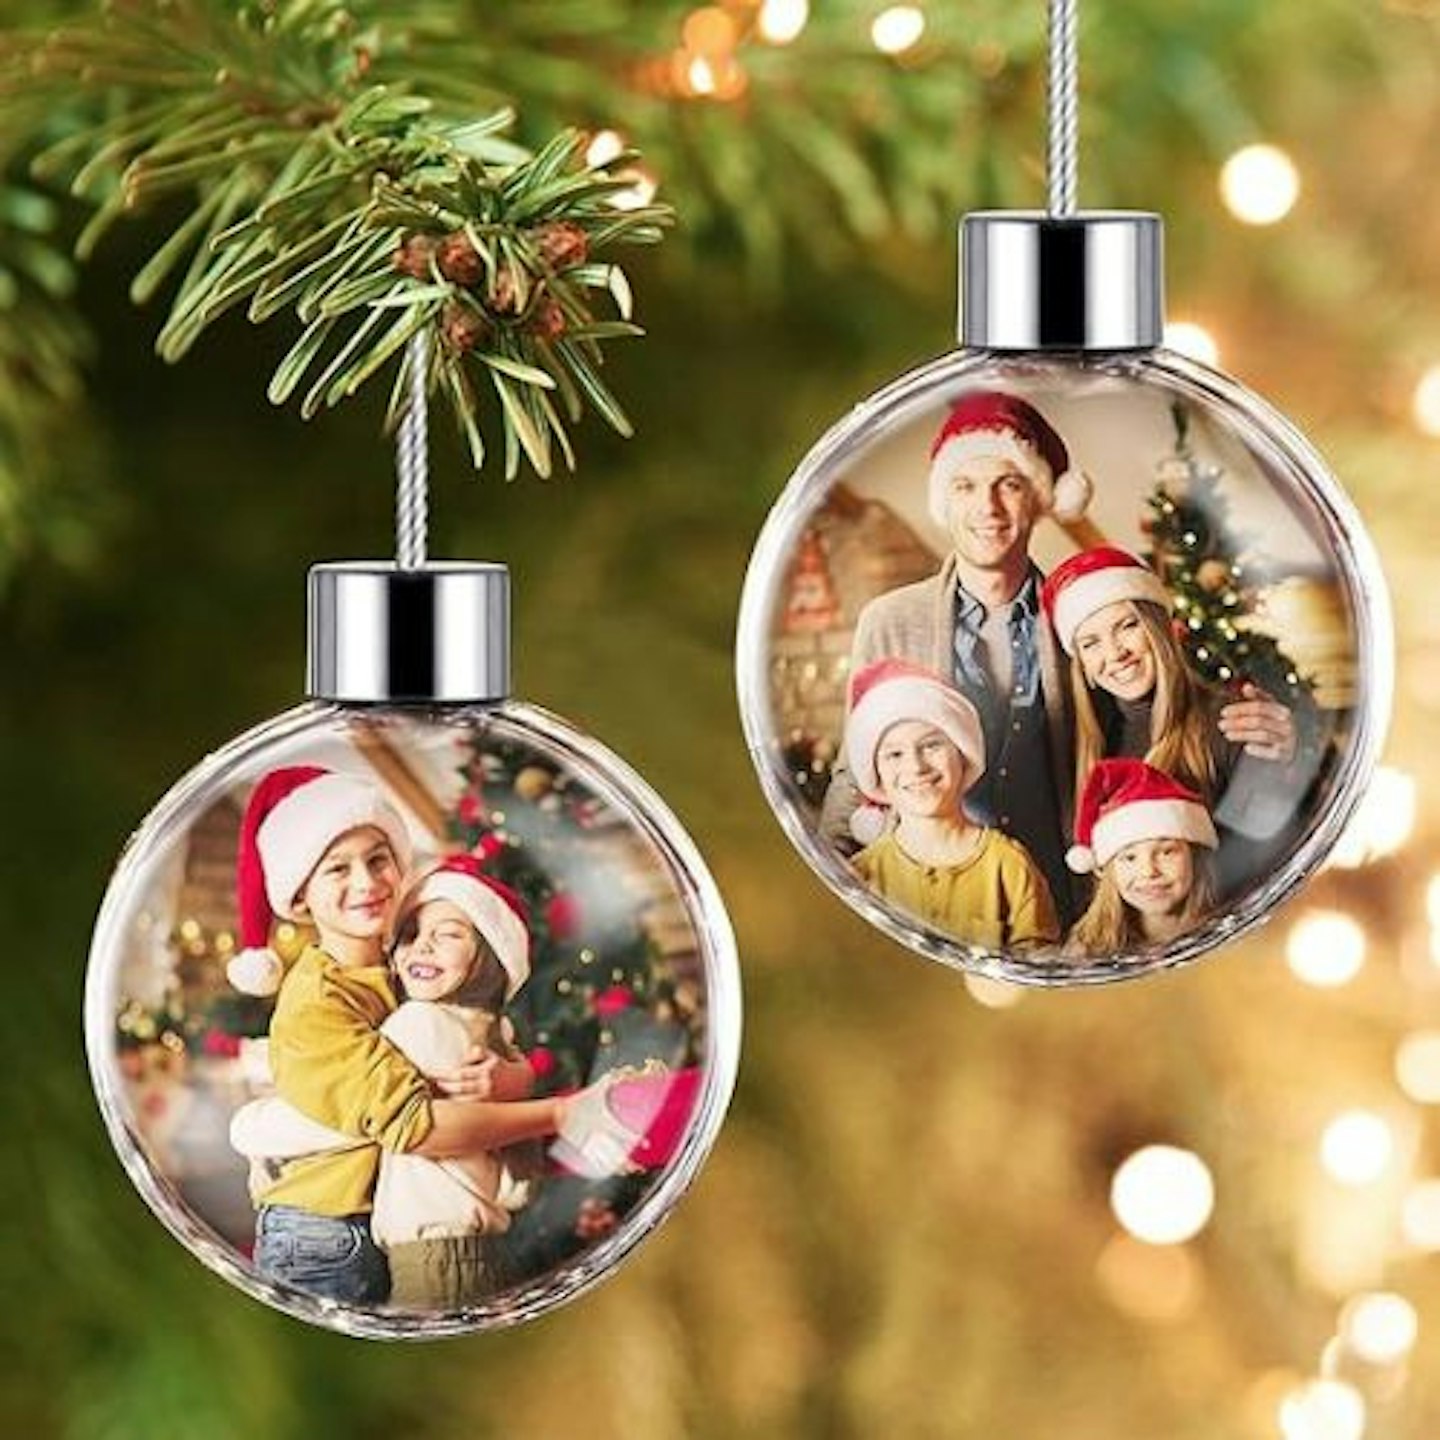 Bemaystar
If you don't want to print out photos yourself, Bemaystar does the work for you. In fact, the quality will be better than any home printer because your photo is UV-printed on aluminium to preserve the colours in rich detail that doesn't fade.
These 8cm Bemaystar Personalised Photo Ball Christmas Baubles make a lovely keepsake for a family member. Available in a range of shapes and sizes, plus a double-sided option, the clear acrylic accommodates the photo that you provide.
Bemaystar takes care of everything for you; all you need to do is select and upload a photo of a loved one, a child or a treasured pet.
Customers praise the novelty of this unique gift idea and the size is just right to see the detail of the photo inside. However, a minority of reviews comment that they received a scratched item. Also, take care to choose a photo that will crop well inside of the shape you choose.
Pros
- UV printing provides a superior-quality image
- Lots of customisable decorations to choose from
- A sentimental and meaningful gift idea
Cons
- Note that the bauble is individually sold
Best craft glue for papercraft
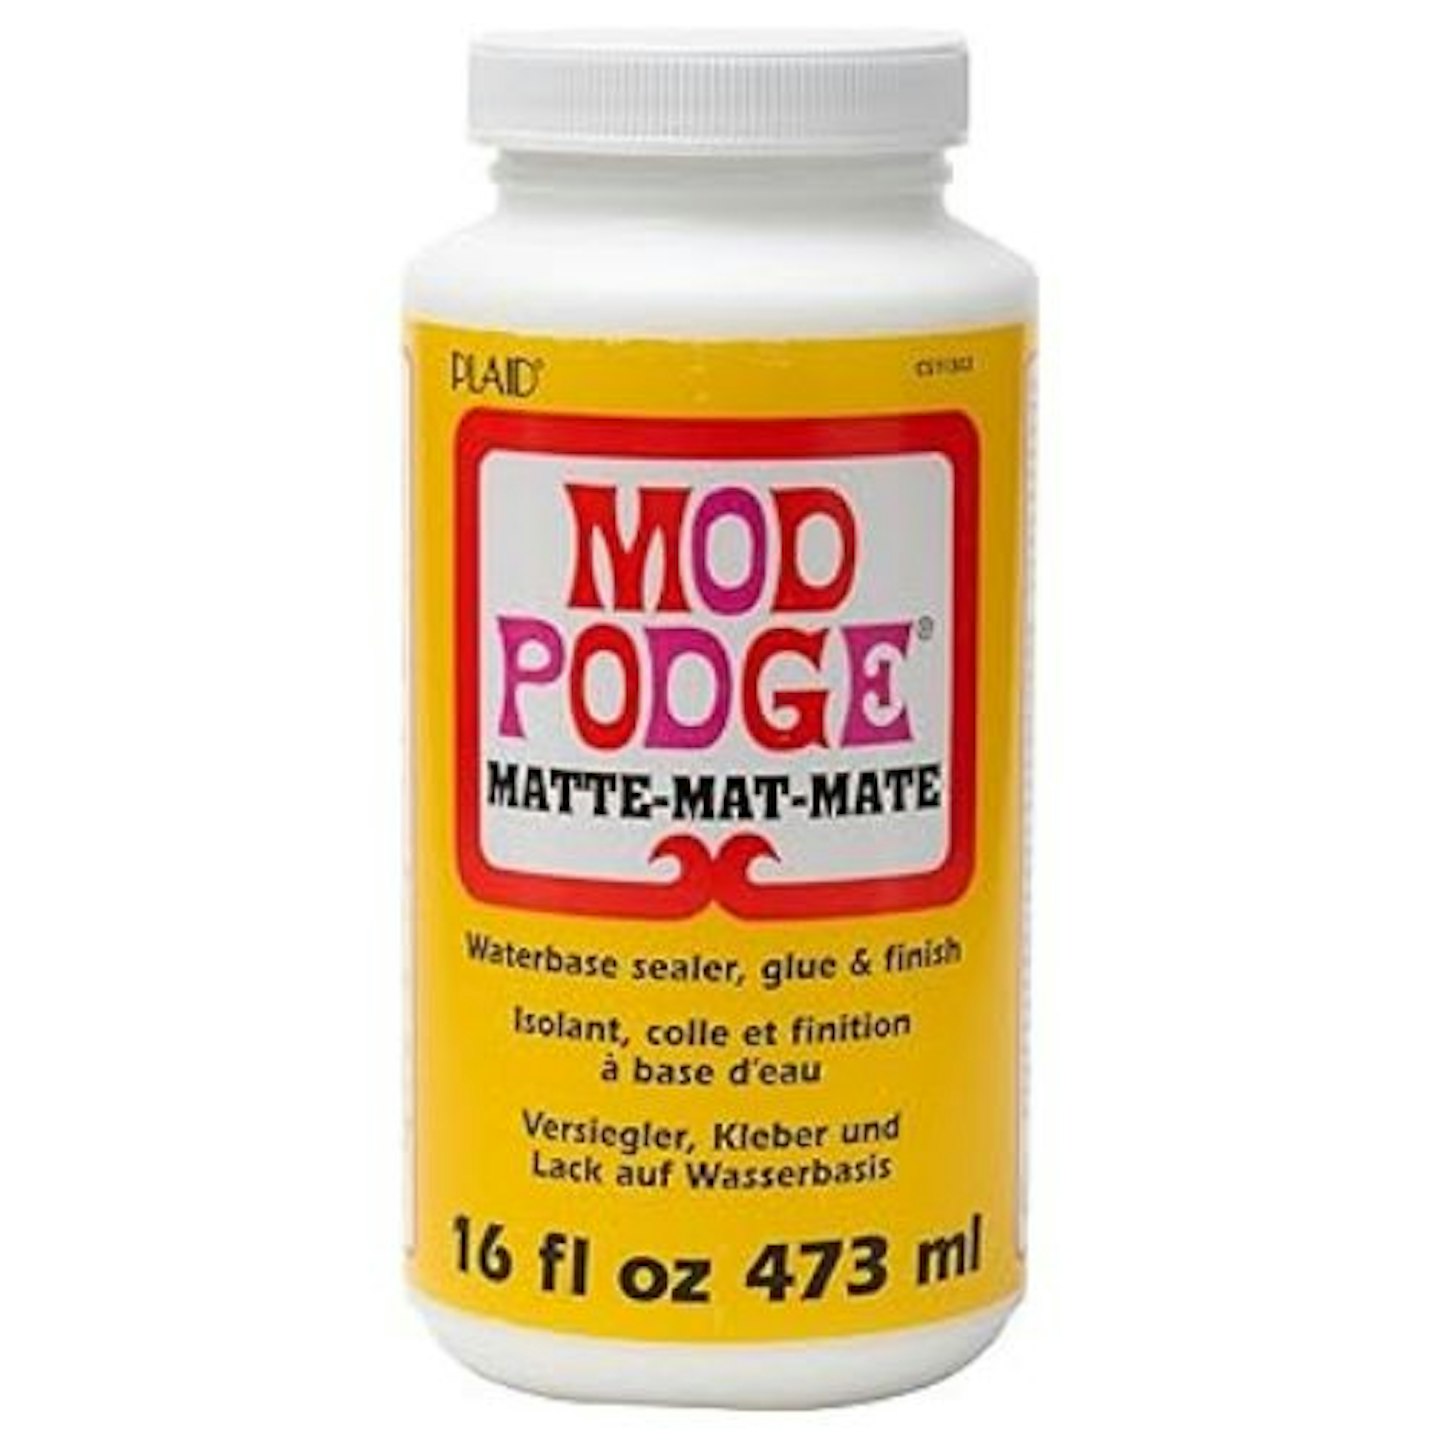 Mod Podge
Used for papercraft. papier-mâché and decoupage with all sorts of papers, Mod Podge is an iconic American glue and surface sealer that offers more protection to a craft object than standard PVA glue. Mod Podge Matte Waterbased Sealer cane be built up in layers. It dries clear – with a matte finish – and can be sanded smooth. It's water-based and non-toxic, plus, it's a doddle to clean up any spillages with soap and water.
This is a popular pick for crafters and an Amazon's Choice recommended product, with over 30,000 reviews rating Mod Podge 4.7 out of 5. Customers praise its versatility for a wide range of craft projects, it a strong adhesive and has a lovely finish. However, compared to usual PVA glue it is a bit more expensive.
Pros
- An safe adhesive and sealer all-in-one
- Popular, long-standing and well-known American brand
- Gives a smooth matte finish to a whole host of papercraft projects
Cons
- More expensive than standard PVA glue
Best glitter tissue paper for craft
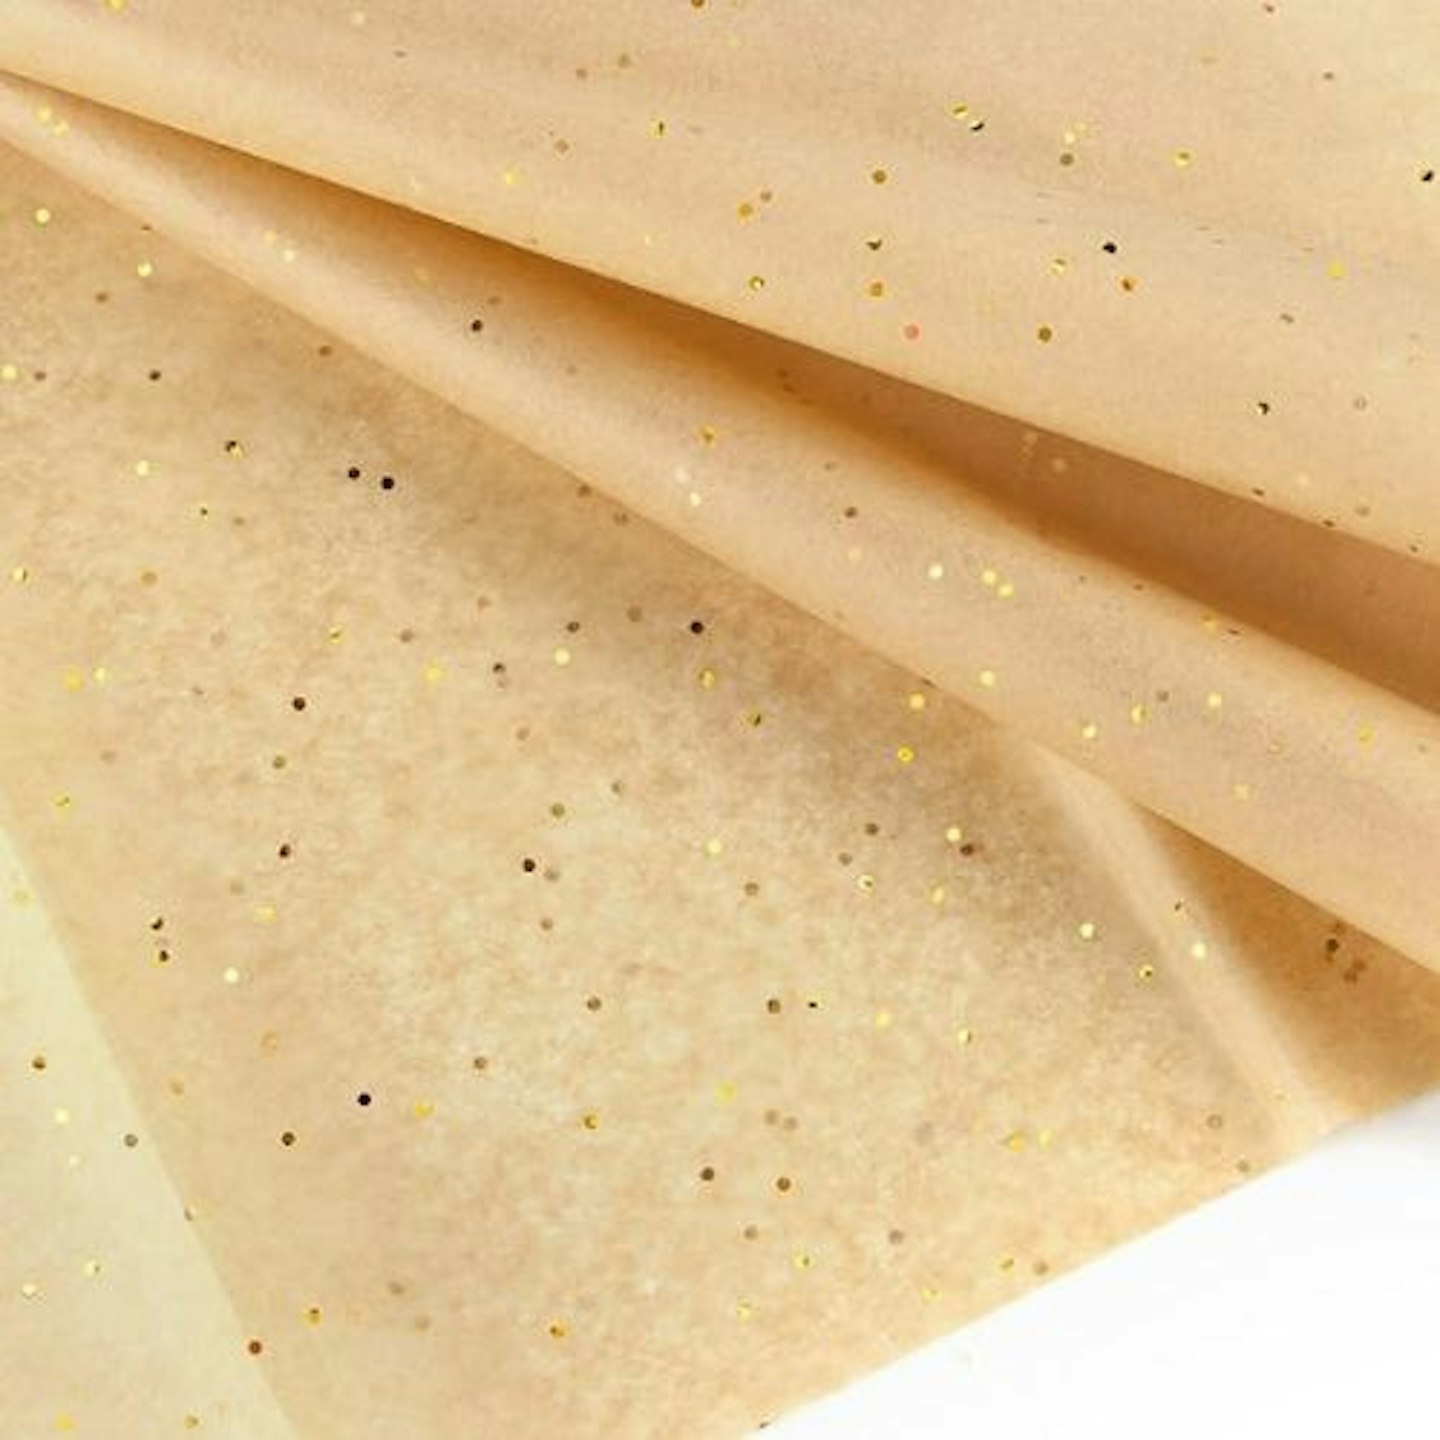 ASTARON
If you're going for a gold and glitter theme this Christmas, the ASTARON Glitter Tissue Paper is some essential decorative paper to have in your craft supplies. The sheets measure 50 x 66cm and are adorned with tiny gold sequins that catch the light. If you're want to create some really special papier-mâché baubles, you could use a combination of the four colours that are available: Glitter Black, Glitter Royal Blue, Glitter White, and this Glitter Brown colourway.
Customer reviews praise the lovely sparkle of this versatile tissue paper. They've used it for wrapping presents and say that it gives a particularly stylish look.
Pros
- Available in four colours with individual sequins attached to the surface
- Value for money pack
- Use as wrapping paper for an expensive look
Cons
- Be aware tissue paper creases and rips very easily
Best sprigs for decoration
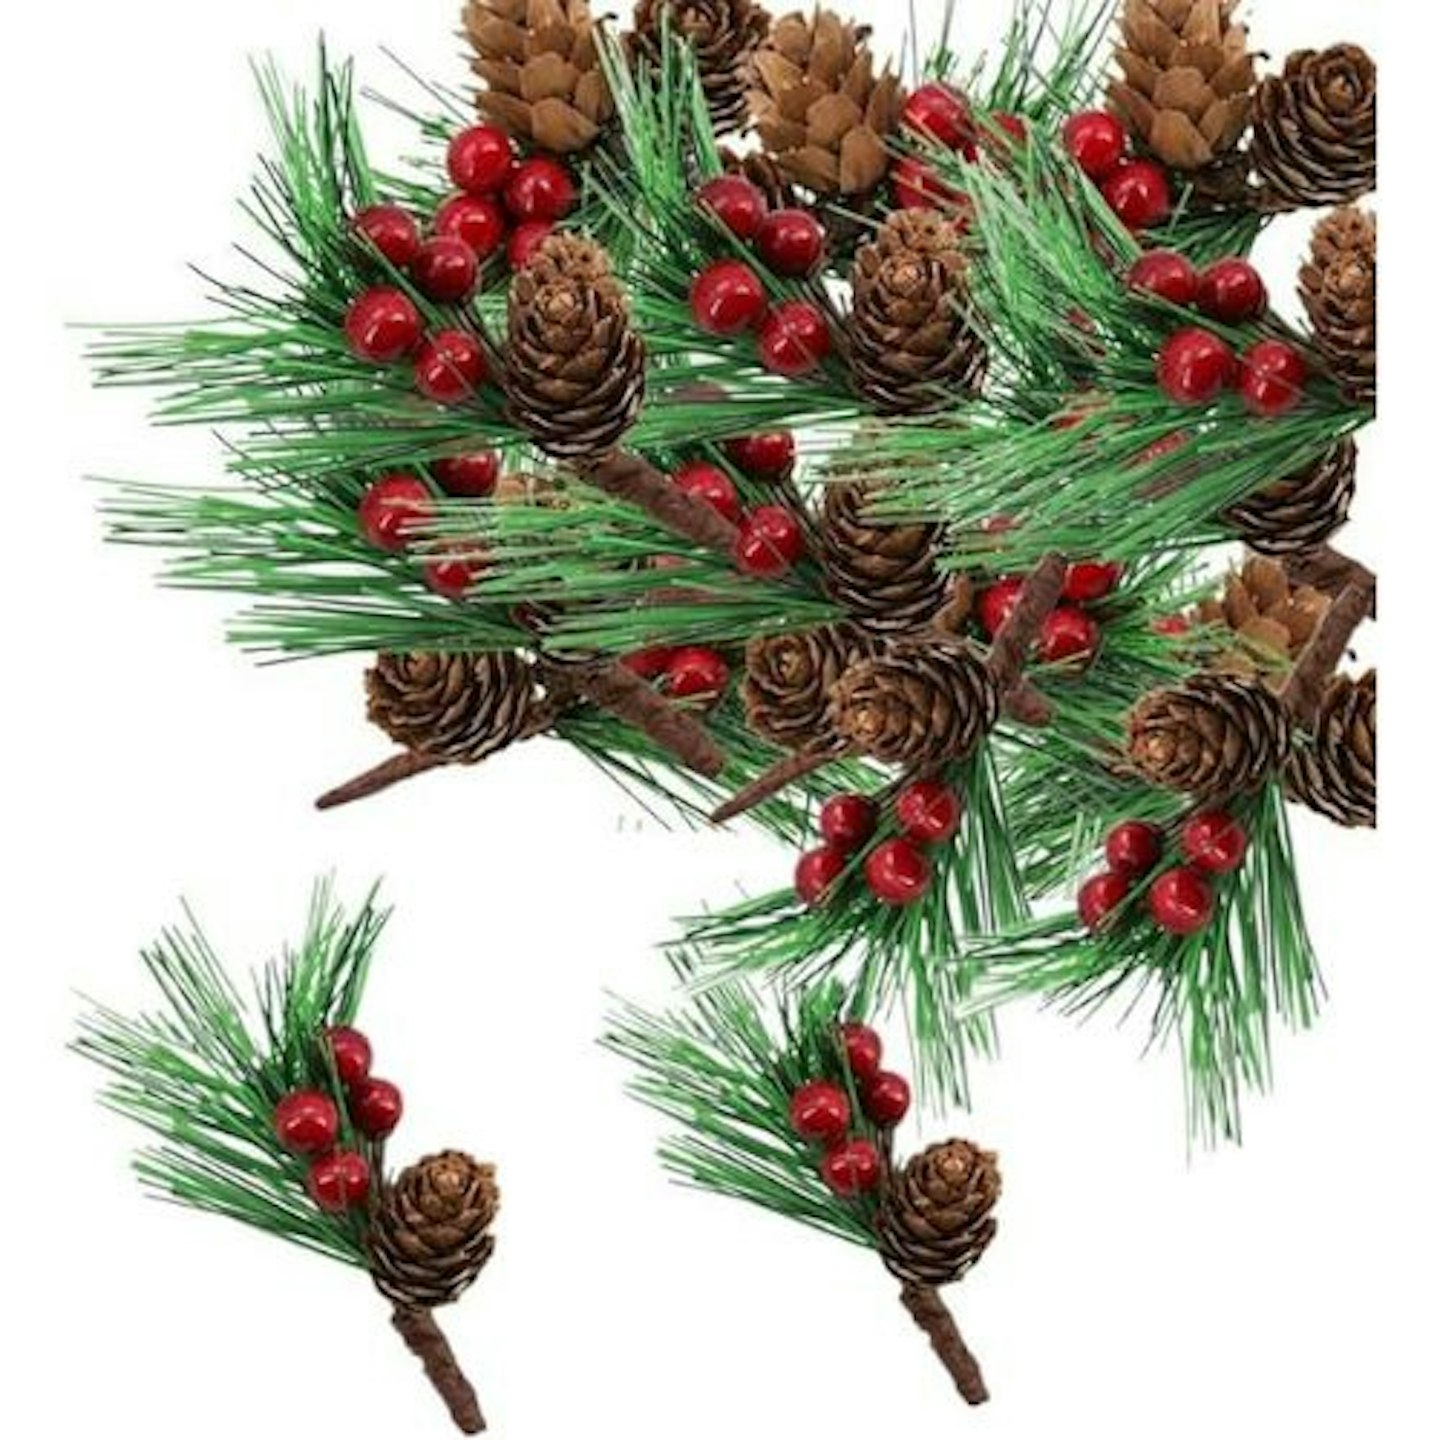 Aisszhao
These small sprigs of pine needles with red berries and pine cones are 7cm long and just right for popping in a clear bauble to make DIY Christmas decorations. In addition, a range of colourful berries, artificial Poinsettia and pine needle sprigs can be purchased separately. Plus, you can create pinecone garlands, a festive table oasis and wreathes without the mess of needles dropping.
This Amazon's Choice recommended product offers great value for money. Each piece is small, so they are ideal for DIY baubles and table decoration.
Pros
- Range of festive berries, sprigs and flowers to choose from
- Amazon's Choice recommended and great value for money
Cons
- Note the size: each piece is 7cm so they are best suited to small decoration
Best colourful twine for crafting
 G2PLUS
Candycane dreams are made of these green and red G2PLUS Christmas Coloured Twines. There is 200m of string to play with here and it could be used for all sorts of decorations, plus, wrapping presents. The cord is strong and made from high quality cotton, so it won't snap if you're tying it.
There are several colourways to choose from, but this particular set really evokes the Christmas spirit. Plus, at less than £8 it's a bargain. In addition, 100m reels are also available.
Customers highly praise this decorative cord and most have used it for gift tags and wrapping presents. Paired with simple brown paper the colourful string looks stylish.
Pros
- Versatile coloured string that doesn't snap or fray
- Range of colourways to choose from
Cons
- Note, if 200m seems like too much string, select the 100m option
Best festive macrame cord
 ilauke
If you're a dab hand at knotting cords to create intricate patterns, you'll love this ilauke Macrame Cord set. This crafting technique has been popularised as wall hangings, jewellery and planters, but it can be used to create Christmas baubles too. There's a link in the guide below.
ilauke cord is available in a range of colours, and this particular set is spot-on for Christmas. Customers praise this Amazon's Choice recommended Macramé cord for being true to the product photo and great quality. It's soft and supple, so there's no difficulty in creating knots.
Pros
- Good quality and value for money
- Supple cord and easy to knot
Cons
- Quite a chunky cord, so not ideal for small DIY baubles
Best pinecones for crafting
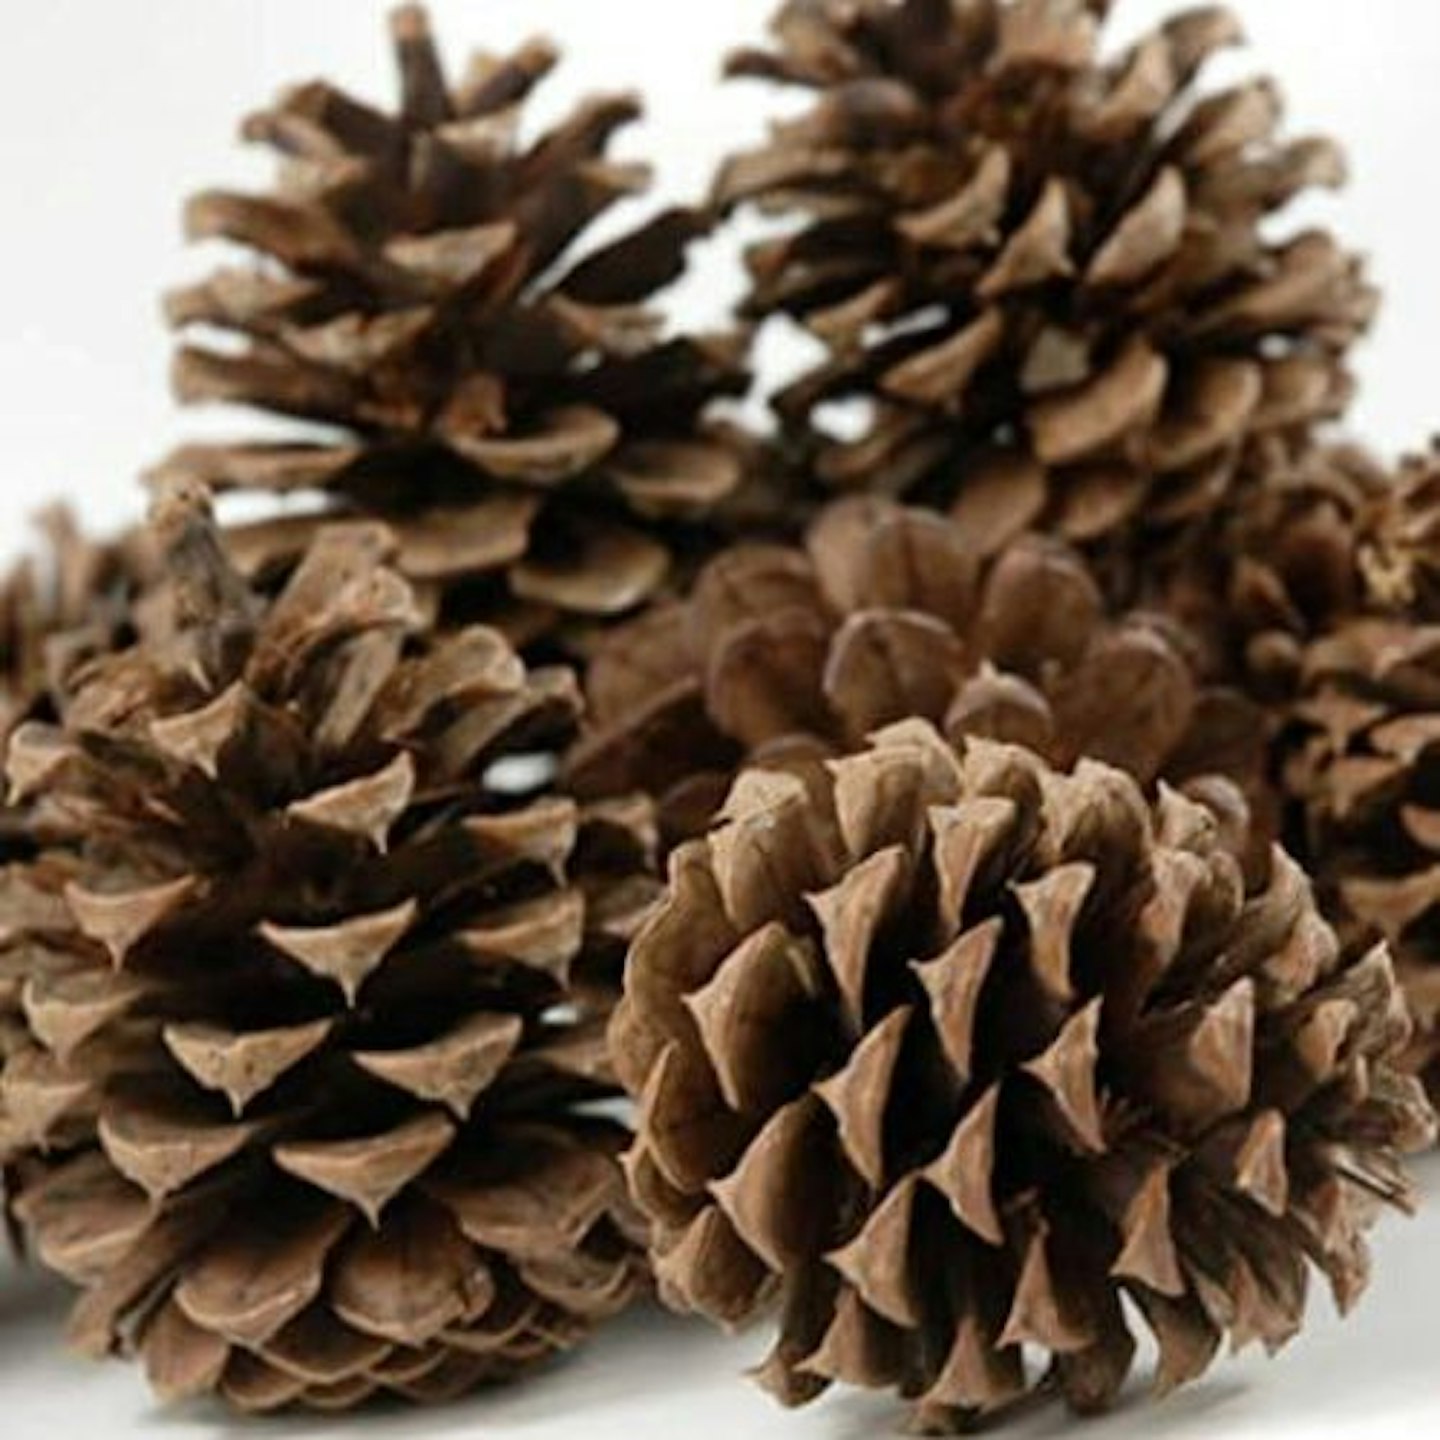 VANVENE
This bumper pack of natural-looking pinecones is around £10 and can be used for festive garlands, centrepieces, floral displays, and more. Each pine cone is between 5-8cm which is a great size for creating a table oasis or a festive vignette in a hurricane jar with a candle and moss.
Customers highly praise these natural pinecones – roll the tips in white paint and they make great hanging decorations. The only thing to bear in mind is that they are sold by weight and some packs will have fewer but bigger pinecones.
Pros
- All-natural pinecones to use it crafts, floristry and for decoration
- Customers praise the quality
- Amazon's Choice recommended product
Cons
- Note because it is a natural product the shape and size will vary
Best festive yarn
 Lily
LilyThis Lily Sugar 'N Cream Mistletoe colourway is irresistible. Create delicious knitted projects with the peppermint-infused ball of yarn. Use for craft and croquet projects over the festive season – it's perfect for making the family Christmas jumpers.
Lily has other colourways too, with blue and pink yarn that evokes Frozen and candy canes.
Customers praise the quality of the yarn, it's strong and easy to knit with. However, it is quite a small ball, so best used for embellishments rather than a whole blanket!
Pros
- Irresistible festive yarn for its colours
- Good quality, easy to use and strong
Cons
- Small ball of yarn
Best glue gun for craft
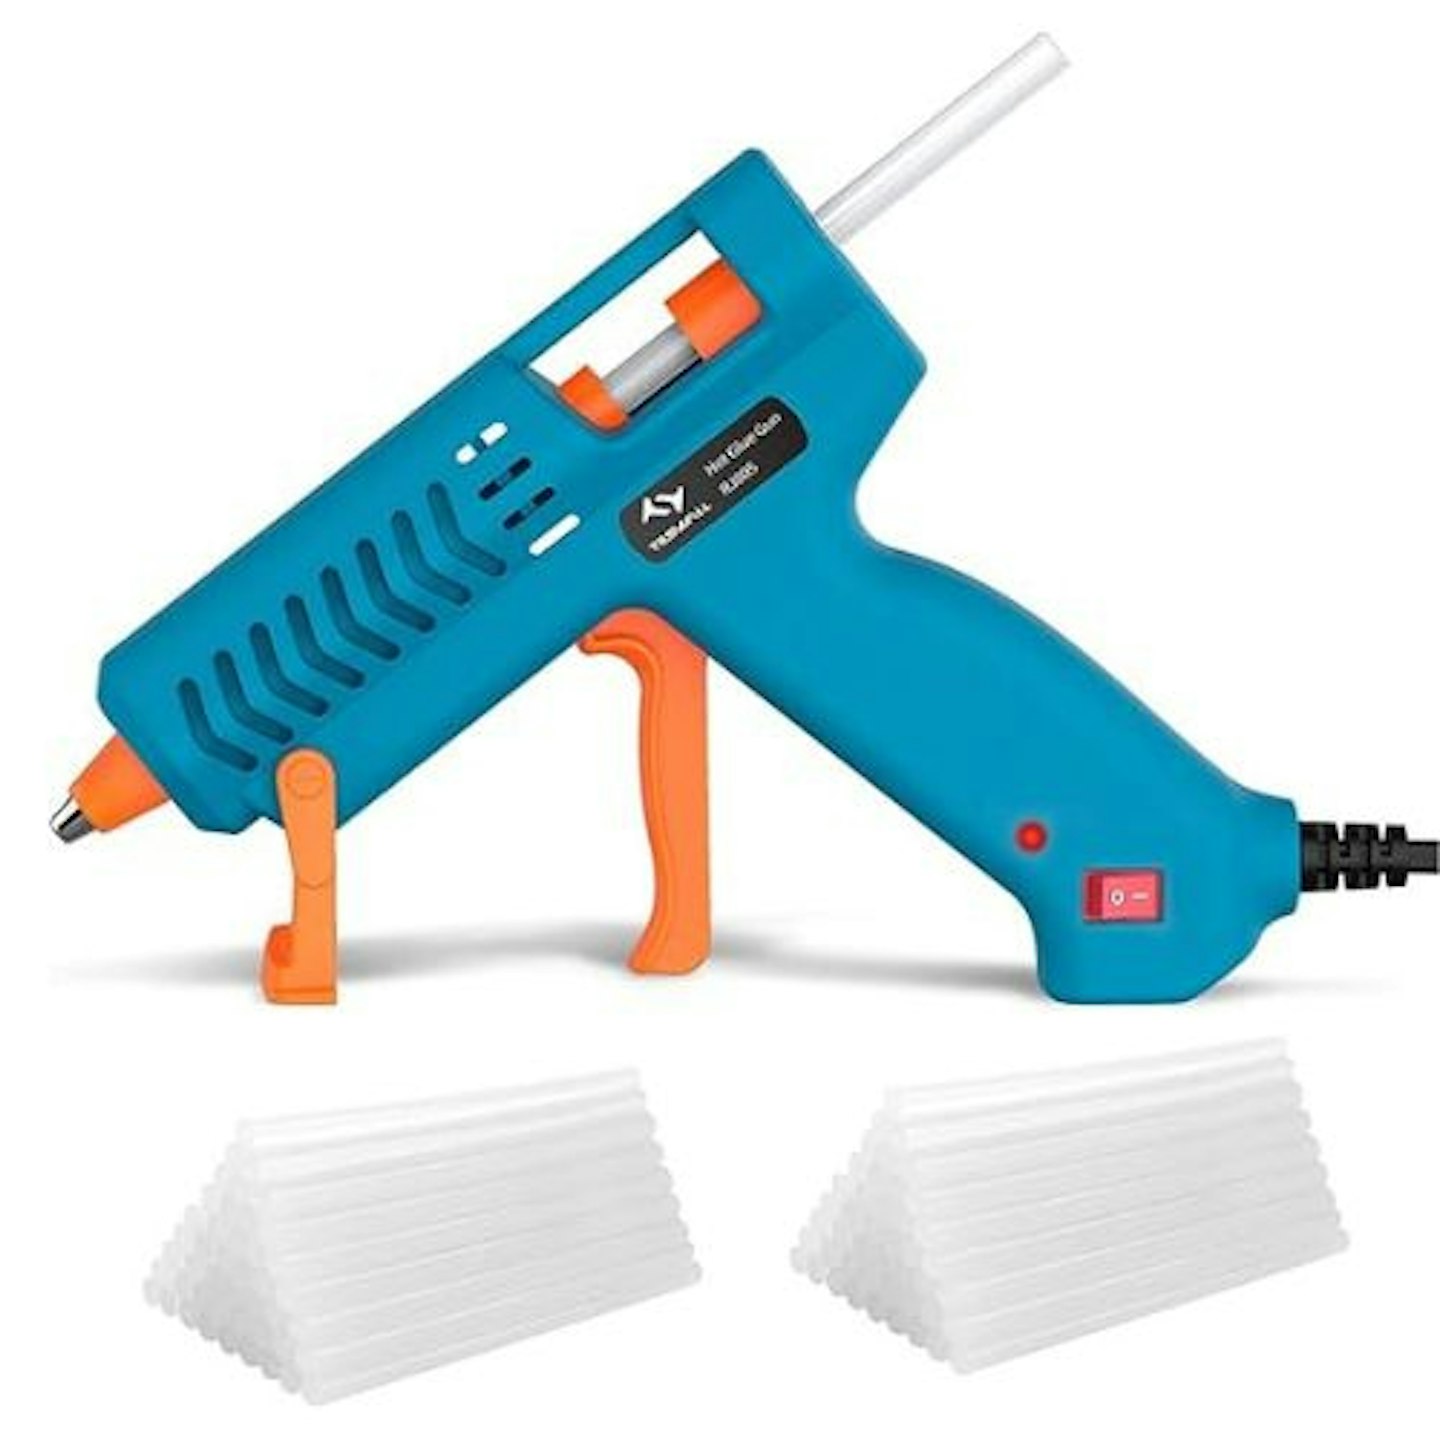 Tilswall
This hot glue gun kit is under £20 and the perfect size for small craft projects. The Tilswall Hot Glue Gun Kit is lightweight and easy to use. It has a precision nozzle and the eco-friendly glue can be used on a wide range of surfaces. It has a handy built-in stand and anti-drip feature to prevent leakage between uses. It comes with plenty of convenient glue sticks, so you can get stuck into a variety of craft projects.
Customers praise this small glue gun for being easy to use. The glue adheres well and can be used for minor repairs around the home. A review comments that individuals who are doing a lot of crafting may require a bigger size glue gun, but this one is fine for light craft projects.
Pros
- Lightweight and easy to use
- Lots of safety features
- Glue adheres well to a range of surfaces
Cons
- Keep away from children
Best cinnamon sticks for craft
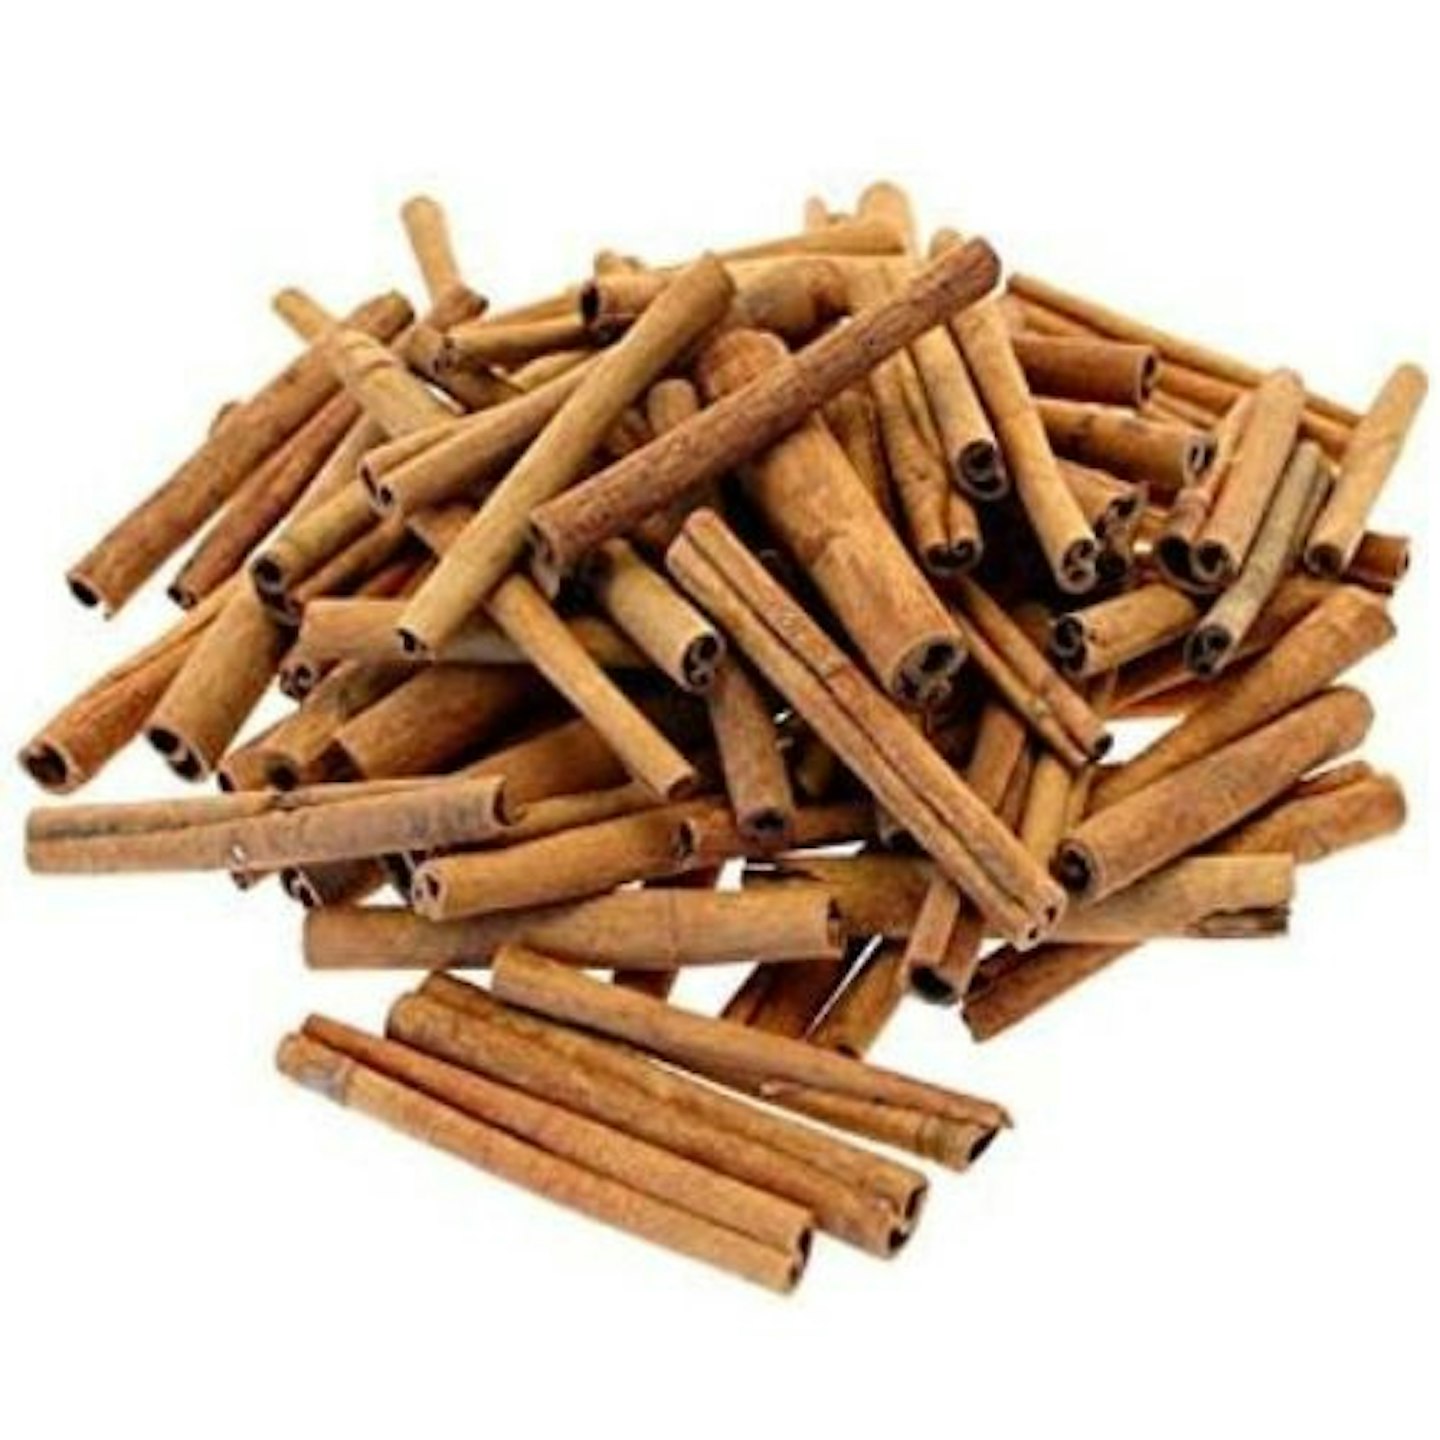 Smithers Oasis
These Dried Cinnamon Sticks are specifically for craft and floristry. Make wreathes, festive table arrangements and garlands. You could wire a couple together in order to create the scrap ribbon Christmas tree ornament in the guide below.
Customers praise this natural craft material for being ideal for wreath-making. The cinnamon sticks did not flake, as one might expect this type of bark to do, when cut in half. Some reviews praise their scent, whilst others felt they didn't retain their fragrance. These cinnamon sticks are not food-grade quality, as such, they're not as scented.
Pros
- Good value pack that's perfect for craft and floristry
- Can be cut without flaking
- Ideal for wreath-making
Cons
- Not food-grade quality, therefore not as scented
Best jute ribbon for craft
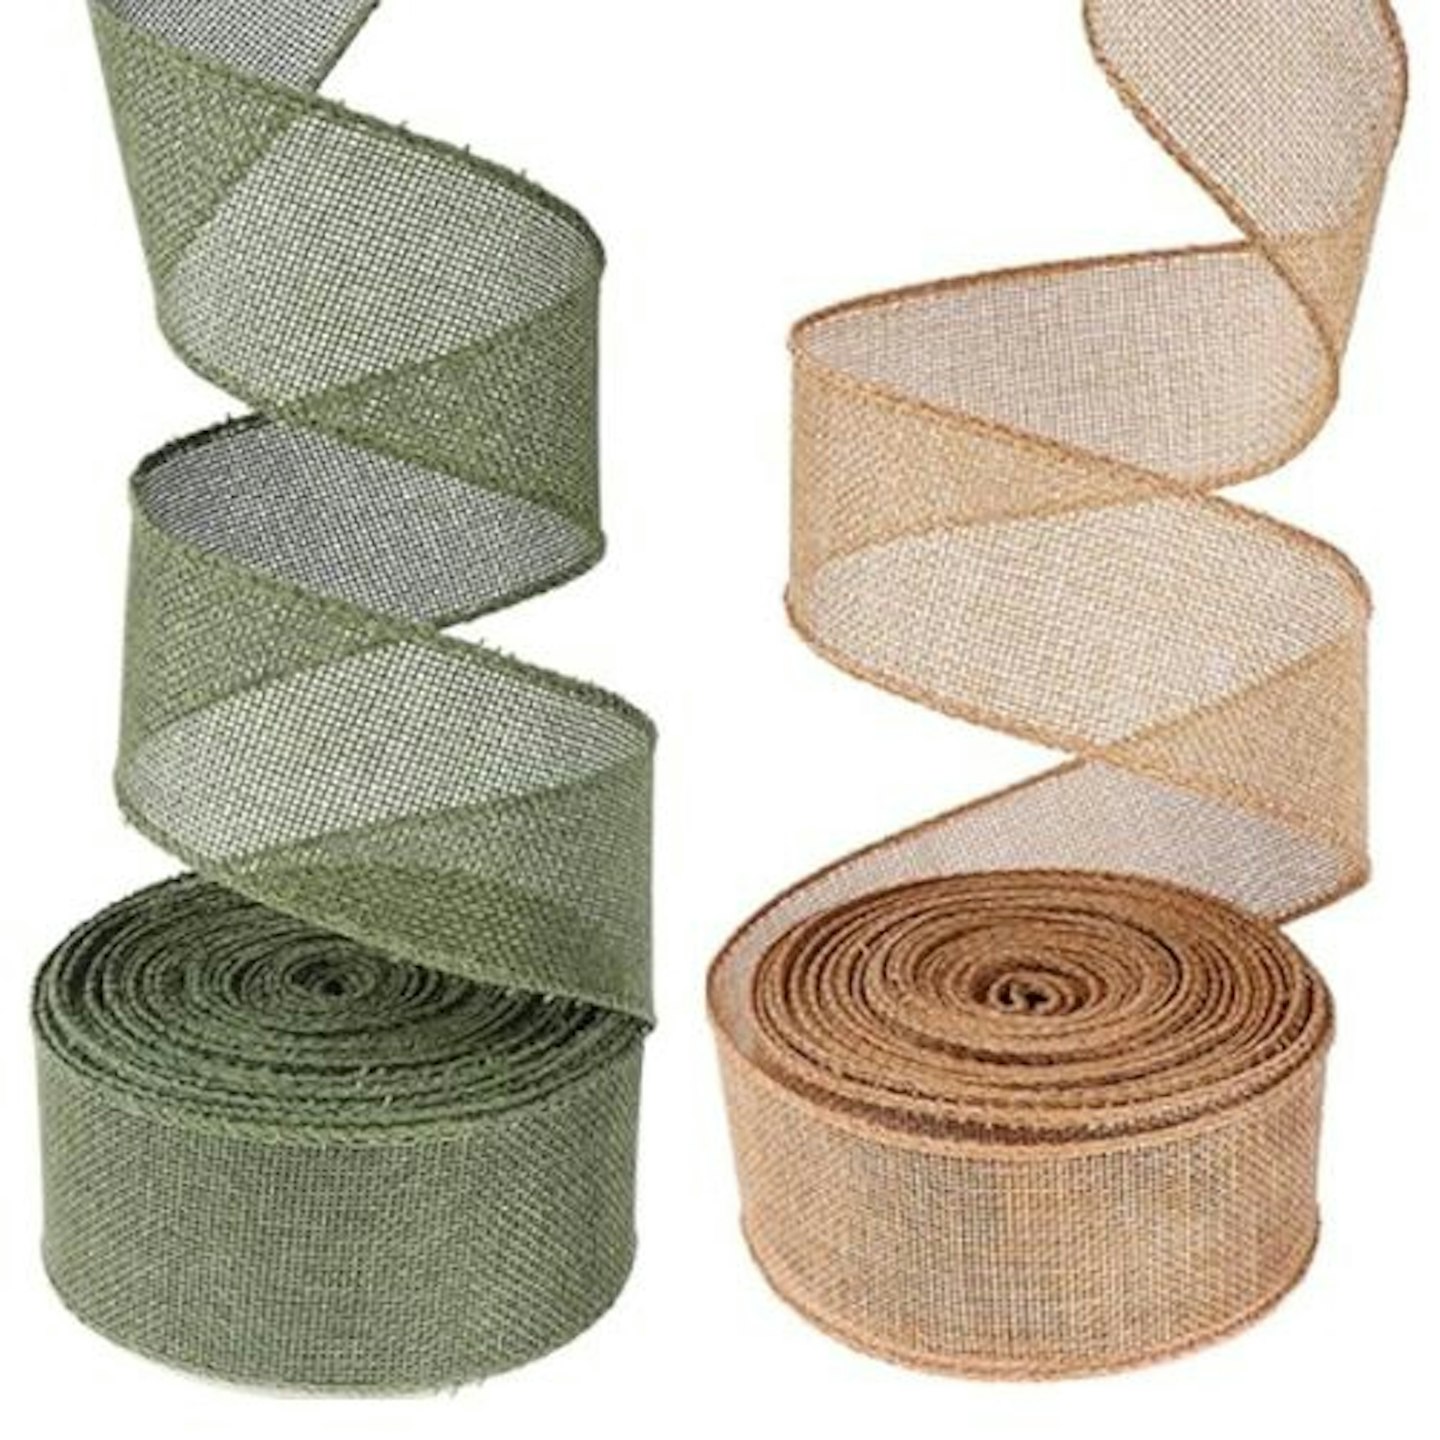 HEZUNHZ
Create unique, vintage-inspired decorations with this rustic yet sophisticated Burlap Fabric Craft Ribbon. The great thing about this type of material is that it has slight stiffness so bows have more structure than silk or organza equivalents. Plus, the understated sage and warm brown ribbons will pair excellently with more vibrant decorations, such as berries and fairy lights.
There are several festive colourways to choose from including some tartan patterns for a bolder look.
Customers say the ribbons are elegant and great quality. However, it's worth noting that the ribbon is not wired, so for particular projects you may need to use a stiffening spray.
Pros
- Great quality and an elegant colour combination
- Wrap presents, use in wreath-making and for decorations
Cons
- Note that the ribbon is not wired
Best wine corks for craft
 Jelinek Cork Group
Give wine corks a new lease of life in your craft, upcycling and home décor projects. These authentic and natural wine corks have the stamps and stains to prove they were once in a bottle of red or white wine. This pack of 100 corks offers a huge range of creative possibilities. They would look great attached to some Champagne Gold Organza Ribbon.
Pros
- Recycled and all-natural wine corks
- Bulk buy and could be used for multiple projects
Cons
- A customer comments that they didn't receive 100 corks, but the majority of reviews are positive
Best DIY Christmas bauble and ornament ideas
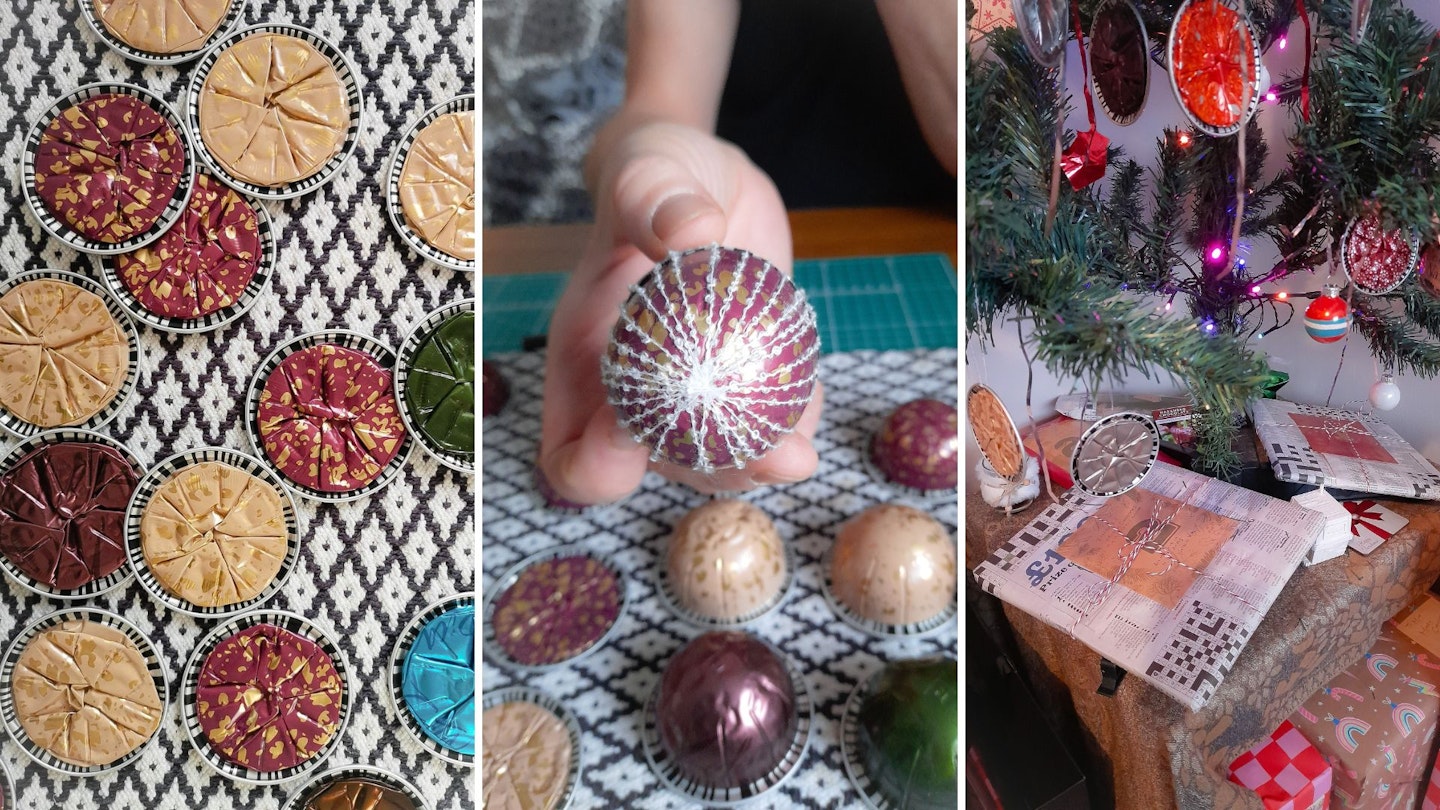
Coffee pod baubles
As well as being passionate about art, Commercial Content Writer, Natalie Knowles, is rather fond of coffee. Last year, she made her own DIY Christmas tree baubles out of coffee pods, from her Nespresso Vertuo coffee pod machine. It's amazing what can be upcycled from household packaging and found objects.
Glitter baubles
Glitter and baubles are a match made in heaven. Even if you don't have fillable baubles, you can still dip the baubles you have in glue and glitter for a sparkling revival.
Nature baubles
You could opt for a forestry theme and place some sprigs of holly inside clear spherical baubles. This is an opportunity to create some Christmas memories with the kids by going out and searching for holly, acorns and flowers to place inside the baubles. Alternatively, there are lots of artificial sprigs available.
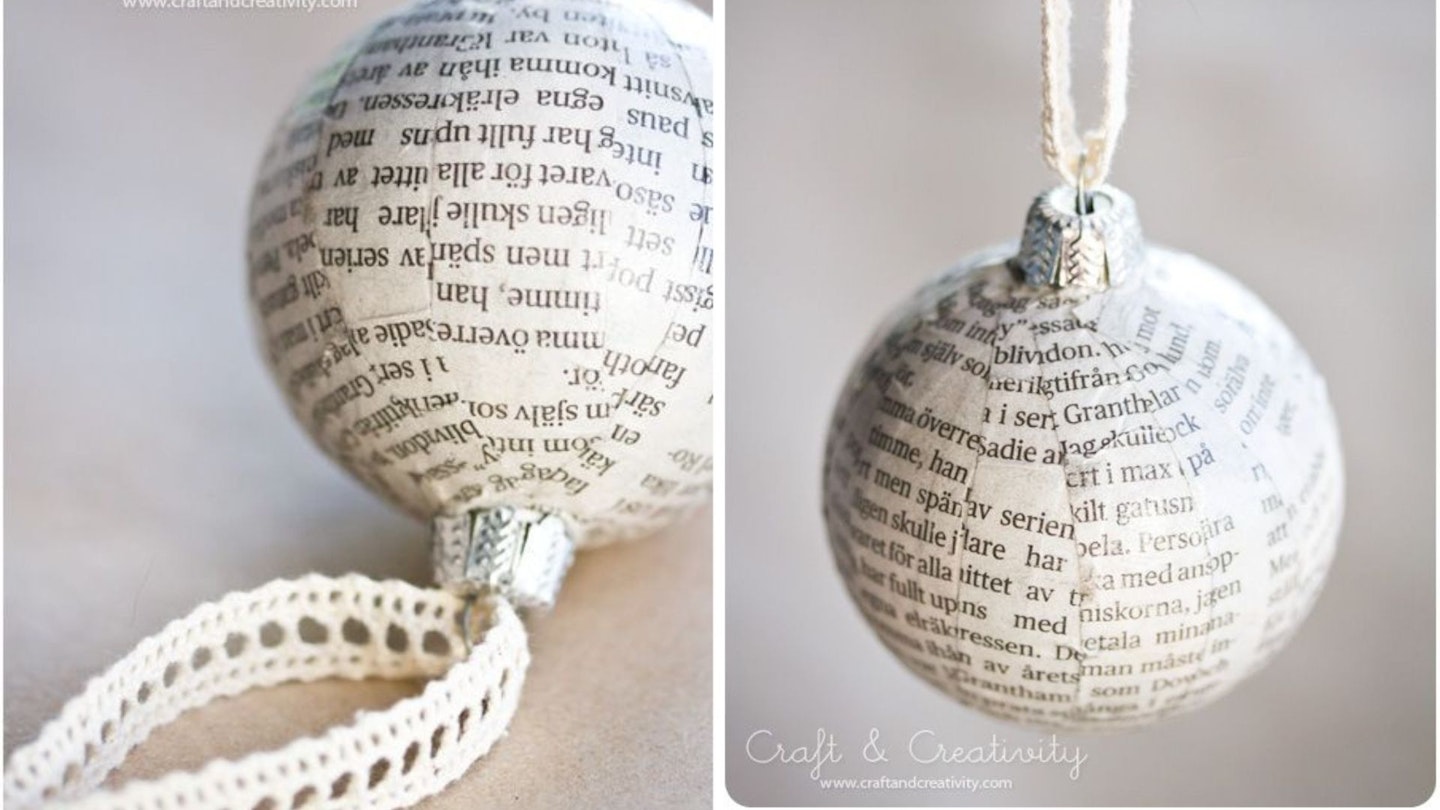
Papier-mâché baubles
This technique is perfect if you've got some old baubles lying around but you want a new design for your tree. Cut lines of newspaper and using Mod Podge lay the newspaper on top of you bauble. This creates the perfect nostalgic and classic bauble.
'Remem-baubles'
For an unforgettable personalised gift idea, try filling your baubles with family mementos or pictures. Simply print out a picture small enough to fit inside the bauble – for best results try printing them on some glossy card. You could have one for each member of the family to create your own family tree!
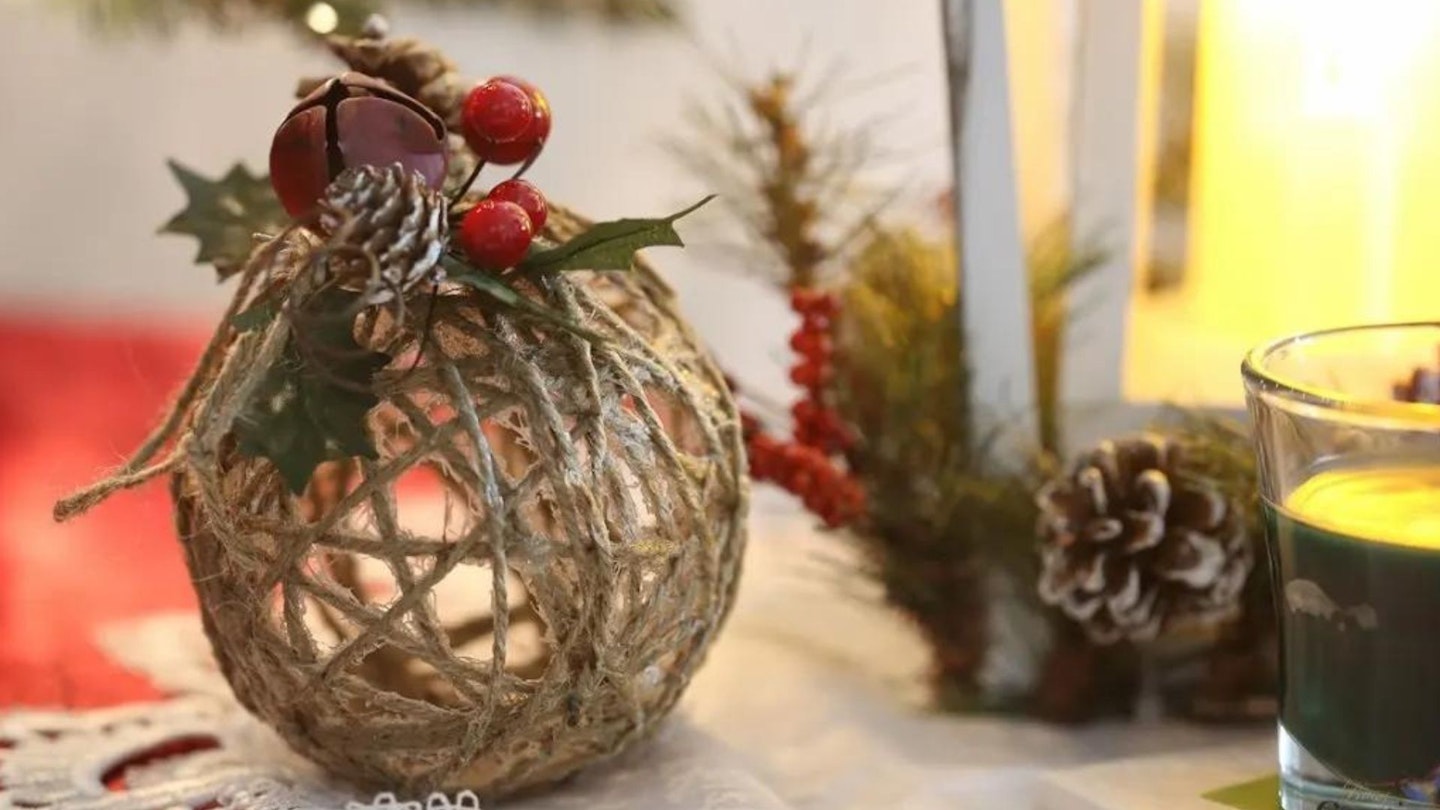
Twine baubles
For this one, simply blow up a balloon roughly to the size you want your bauble to be. Wrap some twine around the balloon to create your design, then paint the entire ball with Mod Podge or whatever liquid glue you have handy. Hang the balls out to dry. Once fully dry, pop the balloon and carefully remove it through the cracks in the twine. Attach another piece of twine for hanging, and any other pieces of holly, berries or bells that you'd like to add.
Bleached pinecones
This process takes a few days, but the results are definitely worth it for a DIY Christmas bauble that everyone will be wanting you to craft for them. Bleaching pinecones transforms the mundane object into a stunning ornament by lightening the colour and opening up the shape. Mix two parts water to one part bleach, and soak the pinecone for at least 48 hours. Then, after you’ve left them out to dry, attach to some twine or ribbon, and voila! You’ve got a beautiful rustic decoration for your tree.
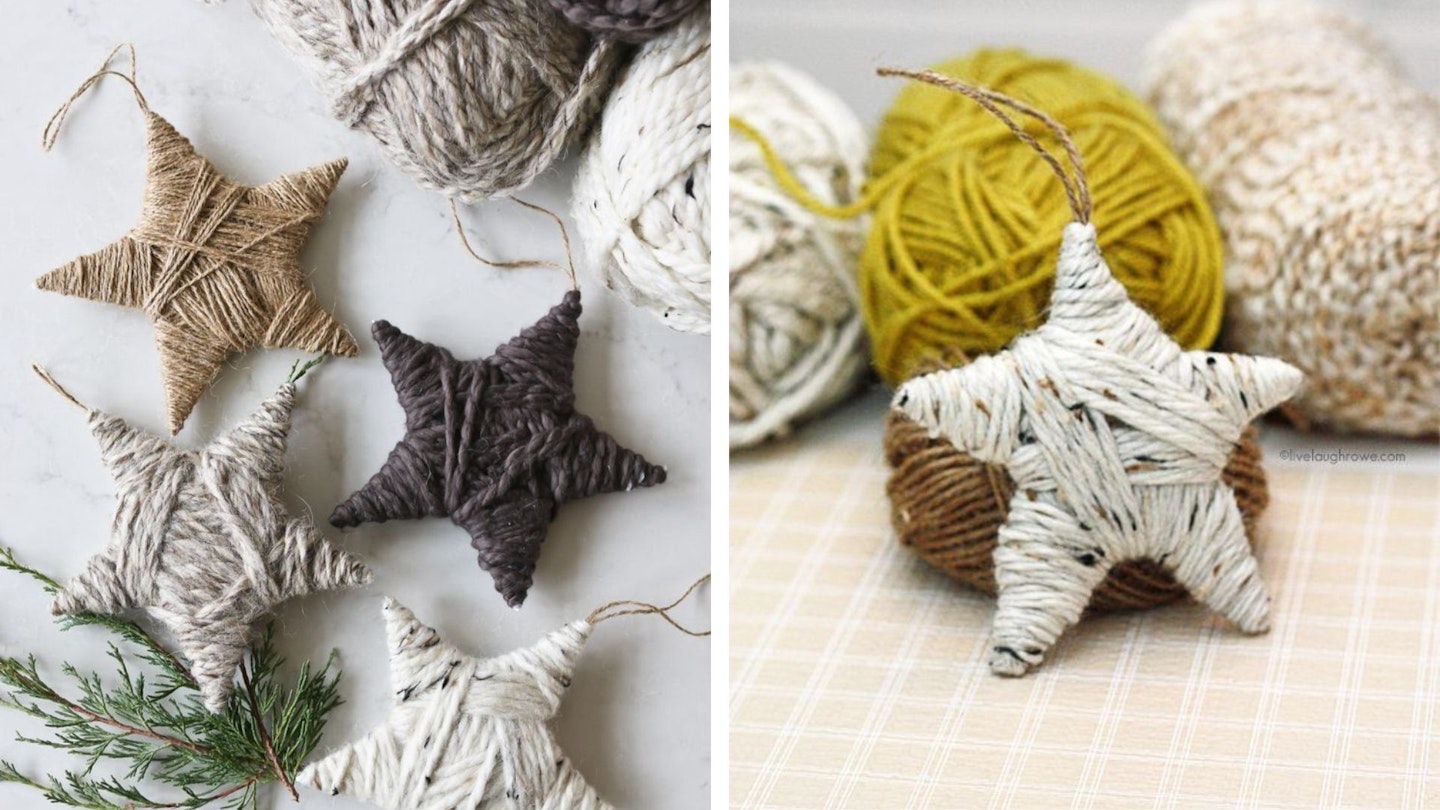
Yarn wrapped stars
This is another really simple DIY Christmas bauble hack. First you cut out a cardboard star and about 10 inches of twine. All you need to do is place a glue dot – using a hot glue gun if you have one – to the tip of the twine so it sticks to the star, and start wrapping the twine around the carboard in different directions. Place another dot of glue on the corners of the star to really keep your design in place. You can vary your wrapping technique and your twine colour to create different designs but still keep a cohesive look for your Christmas tree.
Macramé bauble
If you've a knack for macramé you could experiment with the techniques for creating a macramé plant hanger and use the knotting method to wrap a painted bauble and give it a luxurious tassel. This Hobbycraft guide to making macrame baubles is easy to follow and a great way to bring life to old baubles you were thinking of throwing out.
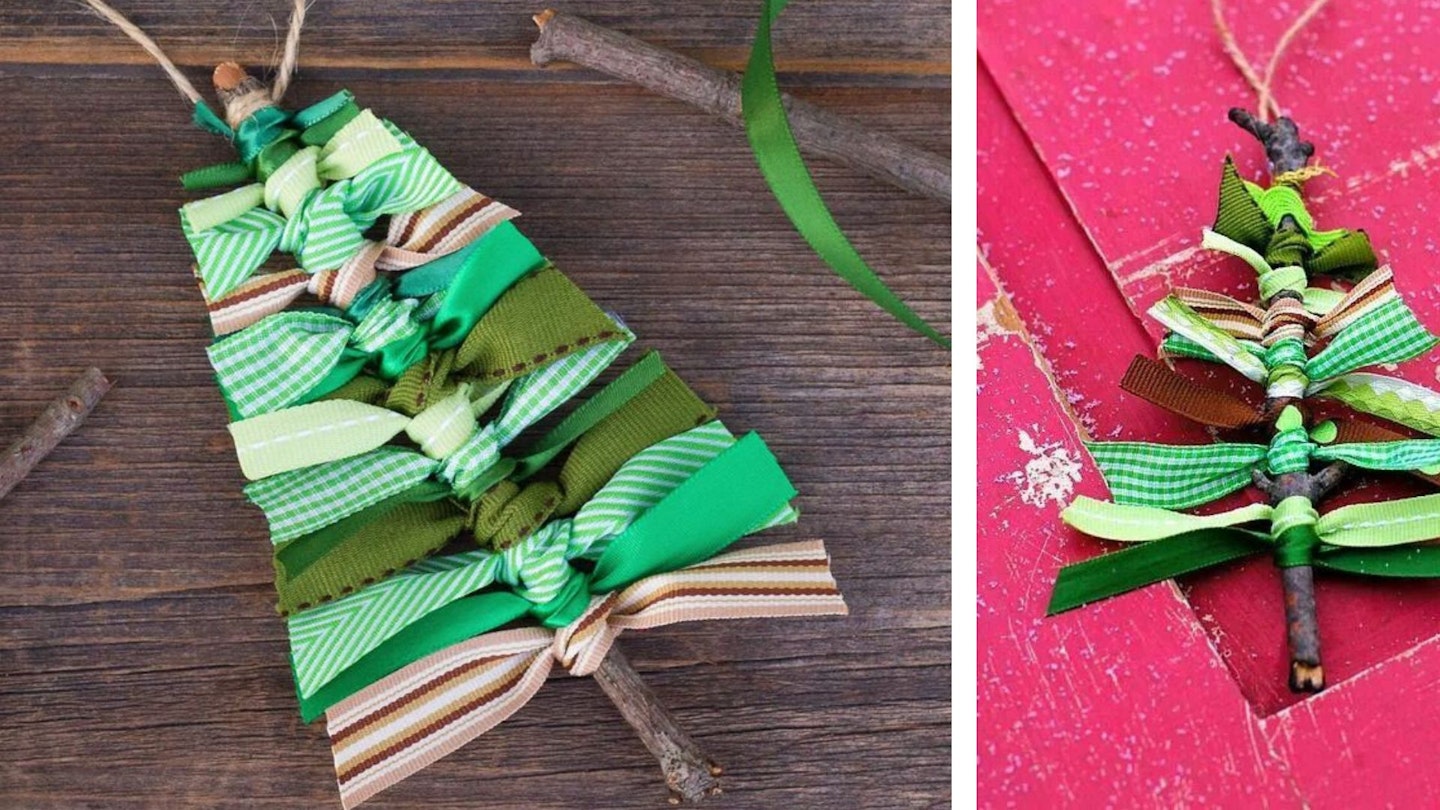
Scrap ribbon Christmas tree ornaments
This one is so easy and can be used using objects already found in your home. All you’ll need to make the trunk of the tree is a twig, or, for an added festive scent, try using a cinnamon stick. Tie multiple scrap ribbons to the trunk, for best results have them close together and slightly overlapping. Then, using a scissors, trim the edges of the ribbon to create a cascading pine tree shape. Tie another ribbon or twine to the top and your ribbon Christmas tree is complete!
Wine cork garland
Wondering what to do with all those wine and champagne corks lying around every Christmas? Here’s your solution! Grab your corks, some stick pins, and a length of ribbon- simply place the flap of the ribbon over the cork and pin it in place! This could also be a great idea for next year if you wanted to save a cork from special memorable champagne pops throughout 2024. Try marking the date on the base of the cork for that added personal touch.
More inspiration for homemade Christmas decorations that can be made with children
Canvas decorations
With a pack of mini canvases you can create hand-painted ornaments. This is an especially great idea for those with young children in the house who are just learning to finger paint. We recommend Assorted Size Mini Art Canvas, 12 pcs from Amazon UK.
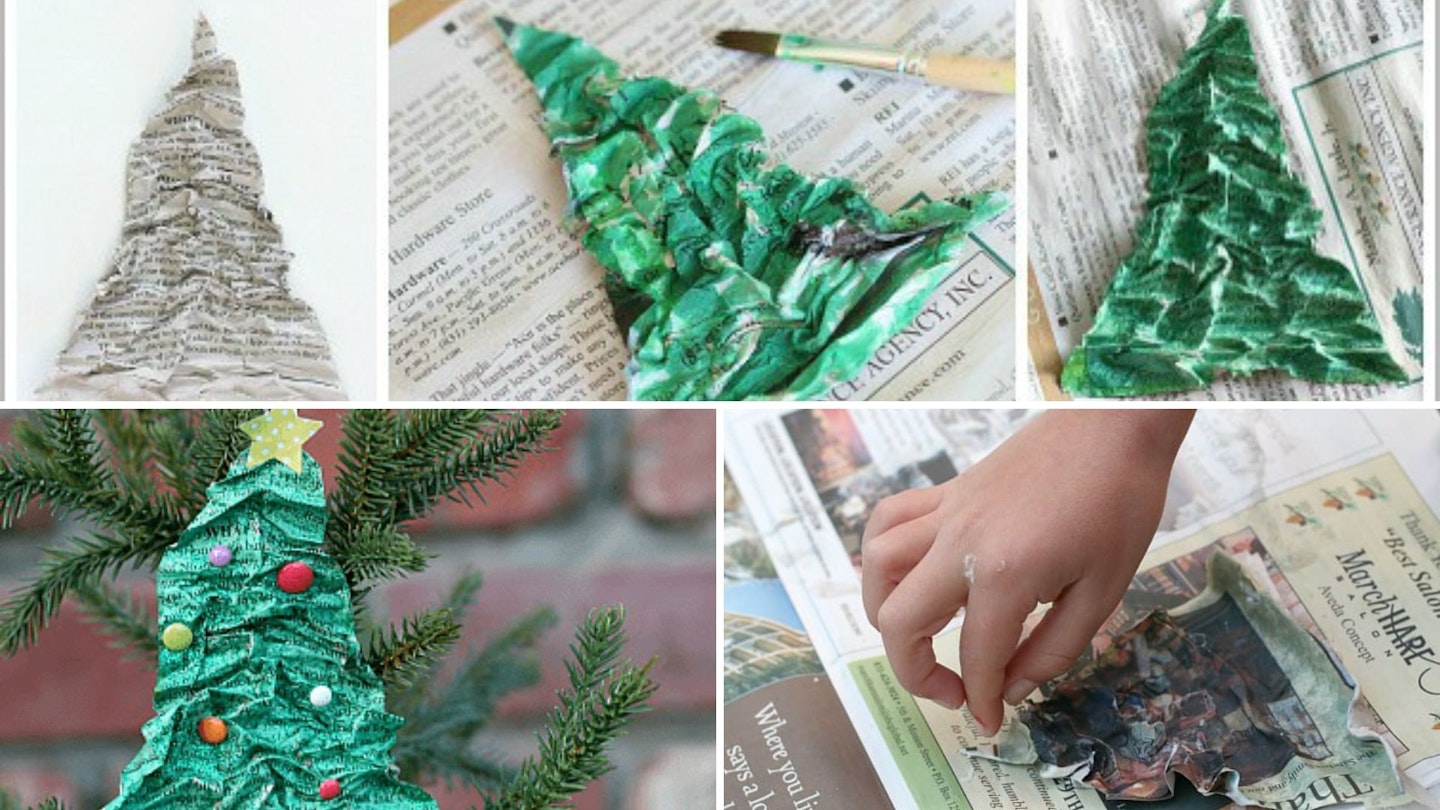
Papier-mâché Christmas trees
If you’ve got young children or grandchildren, this decoration might be the perfect afternoon Christmas activity for your family. First, cut two identical triangle shapes from a newspaper. Then, mix flour and water together to make your mixture. Spread this mixture over the first newspaper triangle and lay the second triangle on top so they stick together. Use your fingers to give the trees some texture, and when you’re satisfied with your shape leave the trees to dry overnight. Now it’s time to paint the trees however you like, and the texture of these decorations means it doesn’t have to be perfect. CRAYOLA Washable Paints are a safe and fun choice for kids.
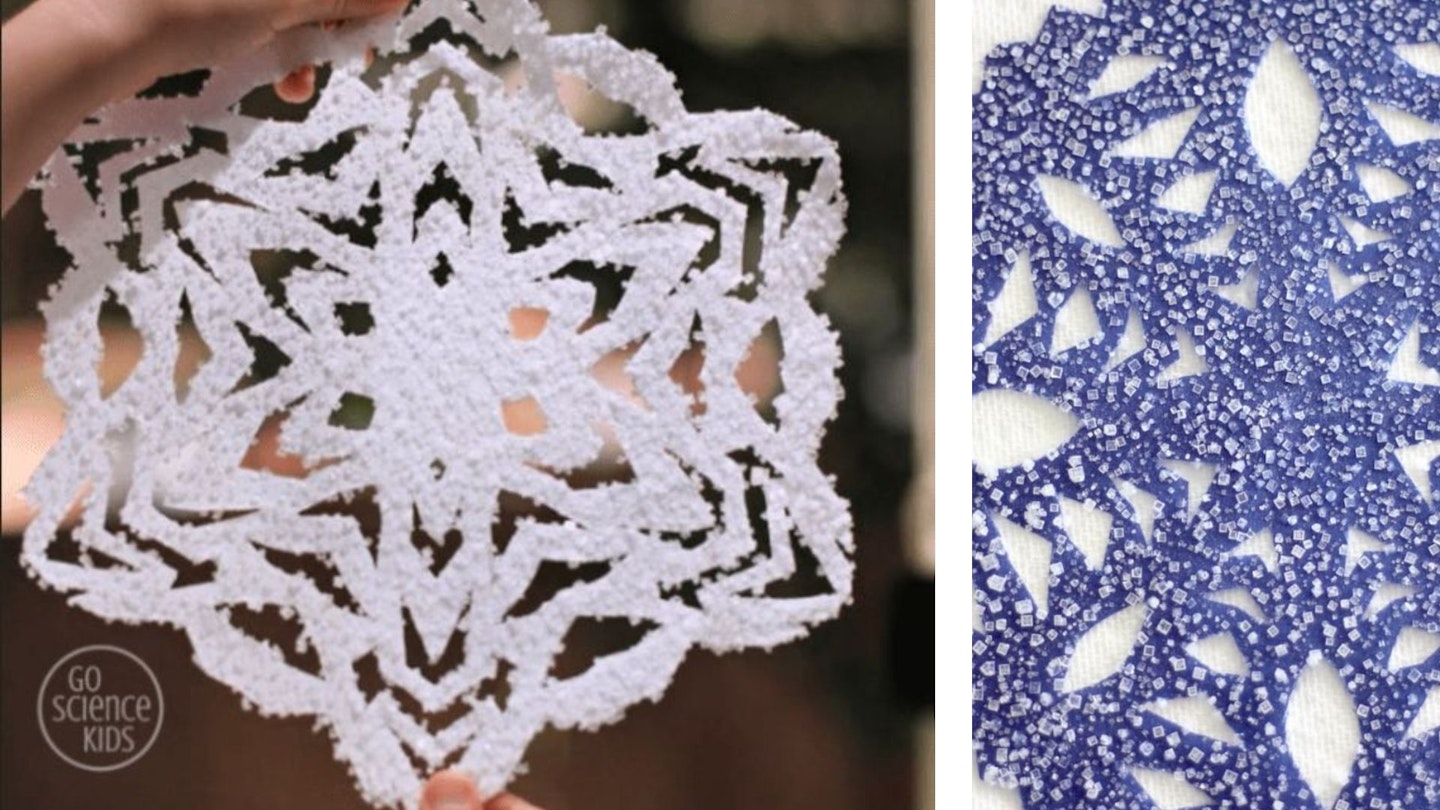
Paper snowflakes
OK, you may not need much guidance on this one, but just in case, here’s a quick how-to. Cut a piece of paper into a circle and fold until you have a triangle shape. Make cuts of varying sizes all over the paper, and when you open up the paper, you’ll be left with a perfect snowflake. Here comes the twist: stir salt and hot water together until dissolved. Place your snowflake on a plate and sprinkle over your water mixture generously. Leave to dry and you’ve got a lifelike snowflake! These can either be blue tacked or taped to surfaces, or loop a string through it to display it on your Christmas tree.
Natalie Knowles is a Homes & Garden Product Writer for Yours, specialising in home appliances. When she's not testing sparkling water makers, she flexes her creative flair as an artist.